Spring Security Misconfiguration

I recently saw Mike Wienser’s SpringOne2GX talk about Application Security Pitfalls. It is very informative and worth watching if you are using Spring’s stack on servlet container.

It reminded me one serious Spring Security Misconfiguration I was facing once. Going to explain it on Spring’s Guide Project called Securing a Web Application. This project uses Spring Boot, Spring Integration and Spring MVC.

Project uses these views:

@Configuration
public class MvcConfig extends WebMvcConfigurerAdapter {
    
    @Override
    public void addViewControllers(ViewControllerRegistry registry) {
        registry.addViewController("/home").setViewName("home");
        registry.addViewController("/").setViewName("home");
        registry.addViewController("/hello").setViewName("hello");
        registry.addViewController("/login").setViewName("login");
    }

}

Where “/home”, “/” and “/login” URLs should be publicly accessible and “/hello” should be accessible only to authenticated user. Here is original Spring Security configuration from Guide:

@Configuration
@EnableWebMvcSecurity
public class WebSecurityConfig extends WebSecurityConfigurerAdapter {
    @Override
    protected void configure(HttpSecurity http) throws Exception {
        http
            .authorizeRequests()
                .antMatchers("/", "/home").permitAll()
                .anyRequest().authenticated();
        http
            .formLogin()
                .loginPage("/login")
                .permitAll()
                .and()
            .logout()
                .permitAll();
    }

    @Override
    protected void configure(AuthenticationManagerBuilder auth) throws Exception {
        auth
            .inMemoryAuthentication()
                .withUser("user").password("password").roles("USER");
    }
}

Nice and explanatory as all Spring’s Guides are. First “configure” method registers “/” and “home” as public and specifies that everything else should be authenticated. It also registers login URL. Second “configure” method specifies authentication method for role “USER”. Of course you don’t want to use it like this in production :).

Now I am going to slightly amend this code.

    @Override
    protected void configure(HttpSecurity http) throws Exception {
        //!!! Don't use this example !!!
        http
            .authorizeRequests()              
                .antMatchers("/hello").hasRole("USER");
        
        //... same as above ...
    }

Everything is public and private endpoints have to be listed. You can see that my amended code have the same behavior as original. In fact it saved one line of code.

But there is serious problem with this. What if my I need to introduce new private endpoint? Let’s say I am not aware of the fact that it needs to be registered in Spring Security configuration. My new endpoint would be public. Such misconfiguration is really hard to catch and can lead to unwanted exposure of URLs.

So conclusion is: Always authenticate all endpoints by default.

Multi module JavaScript project

Multi module JavaScript project with Grunt

Writing blog post how I managed to configure multi module JavaScript project with Grunt for my spare time project. It is using Protractor for end-to-end testing, but I believe that this multi module approach would be easily portable onto non-Angular stack.

In my spare time I work on pet project based on EAN stack (Express, Angular, Node.JS). (Project doesn’t need DB, that’s why MongoDB is missing from famous MEAN stack). Initial draft of the project was scaffolded by Yeoman with usage of angular-fullstack generator. Build is based on Grunt. Apart from that generator was using Grunt, I chose it over Gulp, because it would be probably more mature. Also Grunt vs Gulp battle seem to me similar as Maven vs Gradle one in Java world. I never had a need to move away from Maven. Also don’t like idea of creating  some custom algorithms in build system (bad Bash and Ant experience in the past). Grunt is similar to Maven in terms of configuration approach. I can very easily understand any build in Maven and expect similar build consistency from Grunt.

Nearly immediately I started to feel that Node.JS and Express back-end build concerns (Mocha based test suite) are pretty different to concerns of Angular front-end build (minification, Require.js optimalization, Karma based test suite, …). There was clear distinction between these two.

My main problem was having separate test suites. Karma makes generation of unit test code coverage very easy. Slightly tricky was setting up generation of code coverage stats for Mocha based server unit test suite. I managed to do that with Instanbul. So far so good. But when I wanted to send my stats to Coveralls server I could do that only for one suite. Coveralls support one stat per project. Combining stat files didn’t work nicely for me.

Multi module JavaScript project

So I felt a need for splitting the projects. As I’m developer with Java background, this situation reminded me Maven multi module project. In this concept you can have various separated projects/sub-modules that can evolve independently. These can be grouped/integrated together via special multi module project. This way you can build large enterprise and also modular application.

So I said to myself, that I wouldn’t give a try to this stack until I figure out how to configure multi module project. I separated main repository called primediser into two:

(Notice I created branch blog-2014-05-19-multi-module-project to to have code consistent with blog post)

So now I am able to set up Continuous Integration for each project and submit coverage stats separately. But how to integrate these two together? I created umbrella project, that doesn’t contain any JavaScript production code (similar to multi module project in Maven world). It will contain only Protractor E2E tests and grunt file for integration two modules.  This project is located in separate Github repository called primediser.

It uses various Grunt plugins and one conditional trick to do the integration:

grunt-git

This plugin is used to clone mentioned sub-projects from Github:

    gitclone: {
      cloneServer: {
        options: {
          repository: 'https://github.com/lkrnac/<%= dirs.server %>',
          directory: '<%= dirs.server %>'
        },
      },
      cloneClient: {
        options: {
          repository: 'https://github.com/lkrnac/<%= dirs.client %>',
          directory: '<%= dirs.client %>'
        },
      },
    },

I could use grunt-shell plugin for this (I am using it anyway if you read further), but this one seems to be platform independent. Grunt-shell obviously isn’t.

Conditional cloning

Git can clone repository only once. Second attempt fails. Therefore we need to clone sub-projects only when they don’t exist. It is obviously up to developer to

  var cloneIfMissing = function (subTask) {
    var directory = grunt.config.get('gitclone')[subTask].options.directory;
    var exists = fs.existsSync(directory);
    if (!exists) {
      grunt.task.run('gitclone:' + subTask);
    }
  };

  grunt.registerTask('cloneSubprojects', function () {
    cloneIfMissing('cloneClient');
    cloneIfMissing('cloneServer');
  });

My setup expects that developer would update sub-projects as needed. Also expects that Continuous Integration system that throws away entire workspace after the build. If you would be using Jenkins, you could use similar conditional trick in conjunction with gitupdate maven task that grunt-git provides.

grunt-shell

After cloning, we need to install dependencies for both sub-projects. Unfortunately I didn’t find any platform independent way of doing this (Have to be honest I didn’t look very deeply though).

    shell: {
      npmInstallServer: {
        options: {
          stdout: true,
          stderr: true
        },
        command: 'cd <%= dirs.server %> && npm install && cd ..'
      },
      npmInstallClient: {
        options: {
          stdout: true,
          stderr: true
        },
        command: 'cd <%= dirs.client %> && npm install && bower install && cd ..'
      }
    },

grunt-hub

Next step is to kick off builds of sub-projects via grunt-hub plugin:

    hub: {
      client: {
        src: ['<%= dirs.client %>/Gruntfile.js'],
        tasks: ['build'],
      },
      server: {
        src: ['<%= dirs.server %>/Gruntfile.js'],
        tasks: ['build'],
      },
    },

Tasks configurations

  grunt.registerTask('npmInstallSubprojects', [
    'shell:npmInstallServer',
    'shell:npmInstallClient'
  ]);

  grunt.registerTask('buildSubprojects', [
    'hub:server',
    'hub:client'
  ]);

  grunt.registerTask('coverage', [
    'clean:coverageE2E',
    'copy:coverageStatic',
    'instrument',
    'copy:coverageJsServer',
    'copy:coverageJsClient',
    'express:coverageE2E',
    'protractor_coverage:chrome',
    'makeReport',
    'express:coverageE2E:stop'
  ]);

  grunt.registerTask('default', [
    'cloneSubprojects',
    'npmInstallSubprojects',
    'buildSubprojects',
    //'build',
    'coverage'
  ]);

As you can see there is one task I didn’t mention called coverage:

  • This one gatheres builds of sub-projects into dedicated sub-direcotory
  • Instrument the files
  • Run the Express back-end
  • Kicks Protractor end to end tests
  • and measures front end test coverage

Main driver in this task is grunt-protractor-coverage plugin. I already wrote blog post about this plugin. That blog post was done at stage when there wasn’t multi module configuration in place, so you can expect differences (There is also branch dedicated for that blog post also). Backbone should be the same though.

Step filtering: Skip certain packages while debugging in Eclipse

As Java developer, you are probably using a lot of frameworks. Spring or Hibernate can significantly reduce amount of boilerplate code. But inversion of control, dependency injections and proxies can be confusing during debugging. It is often annoying when debugger steps into third party library code. You realize that your code is wired via proxies and you have to add breakpoint into code you expect to hit.

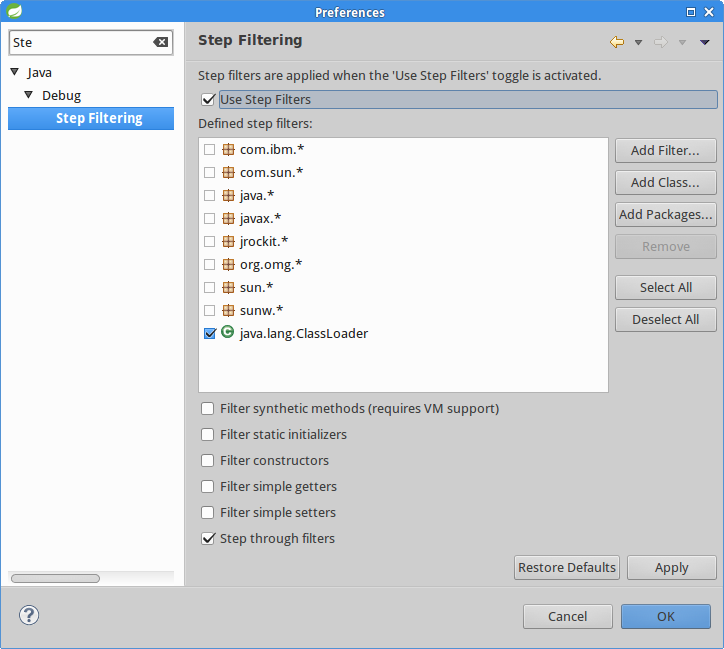
But there is better way in Eclipse. Feature called Step Filtering. Very few my former and current colleagues using Eclipse were aware of it. Just go into Window -> Preferences and search for Step Filtering. Check Use Step Filters and specify packages/classes you want to skip during debugging.

step-filtering

Load implementors of an interface into list with Spring

Last week I wrote a blog post how to load complete inheritance tree of Spring beans into list. Similar feature can be used for autowiring all implementors of certain interface.

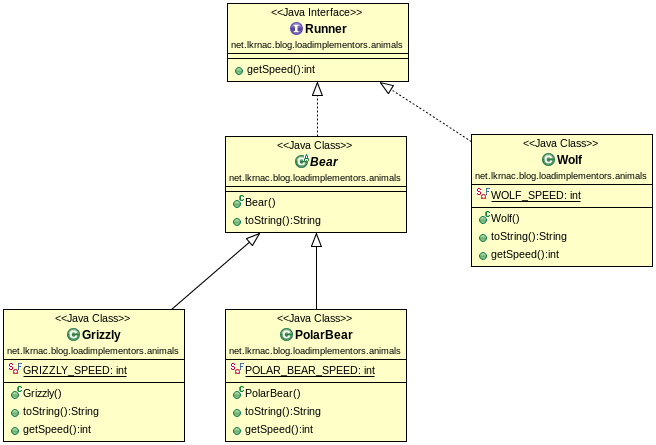
Let’s have this structure of Spring beans. Notice that Bear is abstract class, therefore it’s not a Spring bean. So we have three beas: Wolf, PolarBear and Grizzly.

implementors

Now let’s load implementors into list with constructor injection:

@Service
public class Nature {
	List<Runner> runners;

	@Autowired
	public Nature(List<Runner> runners) {
		this.runners = runners;
	}

	public void showRunners() {
		runners.forEach(System.out::println);
	}
}

Method showRunners is using Java 8 forEach method that consumes method reference.  This construct outputs loaded beans into console. You would find a lot of reading about these new Java 8 features these days.

Spring context is loaded by this main class:

public class Main {
	public static void main(String[] args) {
		AnnotationConfigApplicationContext context =
				new AnnotationConfigApplicationContext(SpringContext.class);

		Nature nature = context.getBean(Nature.class);
		nature.showRunners();
	}
}

Console output:

PolarBear []
Wolf []
Grizzly []

This feature can be handy sometimes. Source code of this short example is on Github.

Generate UML class diagrams from code with ObjectAid

I’ve used ObjectAid Eclipse plugin for years. But very few of my colleagues were aware of it. This fact surprises me and therefore I would like to highlight it. It is very handy for generation of UML class diagrams from your code. It is also invaluable for analyzing of existing design.

One of the top UML tools is Enterprise Architect. But I was never happy with Enterprise Architect usability. I find it much easier to sketch class structure in Java and generate  UML class diagrams by ObjectAid. Advantage of this approach is that you have basic skeleton of the module. You can check-it in, so that team can start working on implementation.

Have to mention that it’s commercial product, but Class Diagram version is free.  For my UML class diagrams needs (design analyze, generating UML diagrams for documentation, modules design sketching) it was enough so far.

They provide also paid Sequence diagram and Diagram Add-On versions. To be honest I have never tried these. For sequence diagrams I was using only Enterprise Architect so far. I would be definitely pushing towards buying ObjectAid licenses if we wouldn’t have Enterprise Architect licenses already.

There’s no point for me to provide detailed description of it, because ObjectAid site contains short and explanatory overview. I suggest to start with One-Minute Introduction.

Everyone understand how inaccurate can UML class diagrams become. Keeping them up to date manually doesn’t make sense at all. ObjectAid fills this gap, because you can maintain your class diagrams up to date. But I had problems in the past when diagrams couldn’t handle renaming or moving of Java classes. Not sure if this is still problem of recent versions, because my diagrams are short lived. I can easily generate new diagram by just dragging appropriate classes into Class diagram editor. This is beauty of ObjectAid plugin.

Links: