Promises vs Callbacks - Code comparison

Promises vs Callbacks – Code comparison

I am not going to highlight pros of promises and cons of callbacks. There is plenty of good reading about this topic out there. I was recently writing simple Node module and decided to learn promises during its implementation. The result  can be interesting as comparison of Promises vs Callbacks approach applied to the same problems, because project contains

These are glued with Gulp build system to execute tests with all possible combinations. So for example Callbacks based test is executed also against Promises based module.

I named the project Jasstor. I am planning to use it for storage credentials into JSON file, hashing and verification of credentials. It stores user name, hashed password and user’s role in string format. Here is Github branch dedicated to this blog post, so that it’ll stay consistent. Please bear in mind, that I am learning Node development, ES6 features, Promises and Gulp on this project. So I could easily miss handy tricks or misused some features.

Project uses these main technologies:

I decided to have these constraints for Promises

  • Mocha will be excluded from promisification, so describe and it will be used with callbacks.
  • Jasstor‘s API will follow standard Node JS patterns
    • All functions are asynchronous with callback as last parameter
    • First parameter of callback is always error

When function signatures follow Node JS patters, it allows for promisification of modules. Such modules can be integrated into promise chain easily. But at the same time API isn’t tied to Promises at all. I like this approach because both camps (Promises or Callbacks fans) are happy.

Let’s take a look at code. I will explain and compare only most verbose use case and leave the rest for curios readers. You can find the code here.

Callback vs Promises – Tests comparison

Enough talking, let’s take a look at code. I’ll start with tests explanation as it promotes TDD thinking. Use case should test if existing password is overwritten when credentials for same user are stored. There are these phases in the test:

  1. Credentials file with initial password is created
  2. Read initial password
  3. Overwrite initial password with different one
  4. Read new password
  5. Verify that new password is different to initial one

Callbacks based test

var credentialsFile = 'testCredentials.txt';

var checkError = function(err, done) {
  if (err) {
    done(err);
  }
};

var readPassword = (credentialsFile, done, callback) => {
  fs.readFile(credentialsFile, (err, data) => {
    checkError(err, done);
    var jsonData = JSON.parse(data);
    callback(jsonData.user.password);
  });
};
describe('jasstor', () => {
  var jasstor = new Jasstor(credentialsFile);

  describe('when creadentials file already exist', () => {
    beforeEach(done => {
      fs.unlink(credentialsFile, () => {
        jasstor.saveCredentials('user', 'password', 'role', done);
      });
    });

    it('should overwrite existing password', done => {
      readPassword(credentialsFile, done, (originalPassword) => {
        jasstor.saveCredentials('user', 'password1', 'role', err => {
          checkError(err, done);
          readPassword(credentialsFile, done, (newPassword) => {
            newPassword.should.be.ok;
            originalPassword.should.be.ok;
            newPassword.should.not.equal(originalPassword);
            done();
          });
        });
      });
    });
  });
});

jasstor is testing object and jasstor.saveCredentials() is testing function. There is created helper function readPassword because password needs to be read twice during test. Pretty straight forward callbacks pyramid. I don’t like calling checkError at the beginning of each callback. Annoying Node pattern.

Promises based test

var fs = Bluebird.promisifyAll(require('fs'));
var credentialsFile = 'testCredentials.txt';

var readPassword = (credentialsFile, userName, done) => {
  return fs.readFileAsync(credentialsFile)
    .then(JSON.parse)
    .then(jsonData => {
      return jsonData[userName].password;
    }).catch(done);
};

var ignoreCallback = () => {};

describe('jasstor tested with promises', () => {
  var jasstor = Bluebird.promisifyAll(new Jasstor(credentialsFile));

  describe('when creadentials file already exist', () => {
    beforeEach(done => {
      fs.unlinkAsync(credentialsFile)
        .finally(() => {
          jasstor.saveCredentials('user', 'password', 'role', done);
        }).catch(ignoreCallback);
    });

    it('should overwrite existing password', done => {
      var originalPassword = readPassword(credentialsFile, 'user', done);
      var newPassword;
      jasstor.saveCredentialsAsync('user', 'password1', 'role')
        .then(() => {
          newPassword = readPassword(credentialsFile, 'user', done);
          newPassword.should.be.ok;
          originalPassword.should.be.ok;
          newPassword.should.not.equal(originalPassword);
          done();
        }).catch(done);
    });
  });
});

Important here is promisification of fs library (first line). It patches fs module to have additional methods with Async suffix. These methods return Promise and doesn’t take callback as parameter. This effectively converts existing API to promise based API. Same is done to testing object jasstor.

It was slight surprise to me that Promises actually doesn’t enable for less verbose code. Few facts are pretty obvious to me after this comparison:

  • Much more elegant error handling. As long as error callback has error as first parameter, you can just pass it to catch block as function reference.
  • Callbacks pyramid is flattened. This can improve readability. But readability is probably matter of maturity with certain approach.

Callback vs Promises – Node module comparison

Now I am going to compare code that was tested by tests above.

Callbacks based code

var hashPassword = (password, callback) => {
  bcrypt.genSalt(10, (err, salt) => bcrypt.hash(password, salt, callback));
};

var readJsonFile = (storageFile, callback) => {
  fs.exists(storageFile, (result) => {
    if (result === false) {
      callback(null, {});
    } else {
      fs.readFile(storageFile, (err, data) => {
        var jsonData = JSON.parse(data);
        callback(err, jsonData);
      });
    }
  });
};

module.exports = class Jasstor {
  constructor(storageFile) {
    this.storageFile = storageFile;
  }

  saveCredentials(user, password, role, callback) {
    readJsonFile(this.storageFile, (err, jsonData) => {
      hashPassword(password, (err, hash) => {
        jsonData[user] = {
          password: hash,
          role: role
        };
        var jsonDataString = JSON.stringify(jsonData);

        fs.writeFile(this.storageFile, jsonDataString, callback);
      });
    });
  }
};

Here we have ES6 class Jasstor with constructor and method that saves credentials into JSON file. There are two helper methods hashPassword and readJsonFile to help with repetitive tasks across the Jasstor class. We can see callback pyramid again. It is slightly simplified by helper functions.

Promises based code

var fs = Bluebird.promisifyAll(require('fs'));
var bcrypt = Bluebird.promisifyAll(require('bcrypt'));

var hashPassword = password => {
  return new Promise(resolve => {
    bcrypt.genSaltAsync(10)
      .then(salt => {
        return bcrypt.hashAsync(password, salt);
      }).then(resolve);
  });
};

var readJsonFile = storageFile => {
  return new Promise((resolve, reject) => {
    fs.exists(storageFile, result => {
      if (result === true) {
        fs.readFileAsync(storageFile)
          .then(JSON.parse)
          .then(resolve)
          .catch(reject);
      } else {
        resolve({});
      }
    });
  });
};

module.exports = class Jasstor {
  constructor(storageFile) {
    this.storageFile = storageFile;
  }

  saveCredentials(user, password, role, callback) {
    readJsonFile(this.storageFile).then(jsonData => {
      hashPassword(password).then(hash => {
        jsonData[user] = {
          password: hash,
          role: role
        };
        return jsonData;
      }).then(JSON.stringify)
        .then(jsonDataString => {
          fs.writeFile(this.storageFile, jsonDataString, callback);
        }).catch(callback);
    }).catch(callback);
  }
};

Same implementation packed into Promises is more verbose (hopefully I missed some tricks that could made it shorter). I like again simplified error handling. You maybe spot  that fs.exists isn’t promisified. If you take a look at its API, callback doesn’t have error as first parameter. I suspect, this is why fs.existsAsync doesn’t work correctly. Not sure if this is limitation of Bluebird promises library I am using or Promises A+ specification.

Conclusion

Promises are very nice approach that could totally change style of your programming. But I have to admit that I am not 100% sold to it yet. It took me some time to wrap my head around the concept. Promises also seem to me slightly more verbose than callbacks. When you have functions with one parameter and return value, you can nicely chain them with just passing function references into Promise chain. But mostly you don’t have such comfortable APIs and you end up doing “flattened callbacks pyramid”.

I would suggest to try Promises on your project (or small library) and make own opinion. Examples aren’t enough challenging to push the Promises into its limits.

Watch file changes and propagate errors with Gulp

Gulp fever infected me. Streaming model is very interesting and modern. After initial excitement, I started to experience first pitfalls. This is understandable for such young project. I am going to describe my problem with watching file changes and propagating errors.

Error in Gulp by default breaks the pipe, terminates the build/test and whole Gulp process with some error code. This is fine for CI process. But breaking the pipe stops file watch task also. This is big problem when developer wants to watch file changes and re-run particular tasks (e.g. tests).  You have to start watch task again after error occurs. This makes default watch task in Gulp pretty much useless. It is known and not the only problem of Gulp file watcher.

Fortunately Gulp 4 version if going to fix this. But I needed to come up with solution now. Google search points you to gulp-plumber. Idea behind it is to use gulp-plumber at the beginning of each pipe.

var plumber = require('gulp-plumber');
var coffee = require('gulp-coffee');

gulp.src('./src/*.ext')
    .pipe(plumber())
    .pipe(coffee())
    .pipe(gulp.dest('./dist'));

It prevents unpiping on error and forces the build process to continue regardless of error. Nice. Looks like problem with watch task solved.

I applied this approach on my pet project. It is simple node module that should store encrypted passwords into JSON file. But domain is not important for this blog post. When I checked in build process with gulp-plumber, I started to get false positives by drone.io CI server [EDIT: Build link doesn’t exist anymore].  Drone.io is using process error propagation, where each process returns error code. Non-zero value indicates error and zero means that process finished without error. gulp-plumber forces gulp process to continue and just writes errors to the console. Result is always zero error code from Gulp process.

So my goal is to use gulp-plumber to be able to continuously watch file changes and have fast feedback loop but also force Gulp process exit with non zero result when some error occurs.

First I declared variable to gather if error occurred.

var errorOccured = false;

Created handler for error recording.

var errorHandler = function () {
  console.log('Error occured... ');
  errorOccured = true;
};

Use gulp-plumber together with error handler for each Gulp pipe.

var transpilePipe = lazypipe()
  .pipe(plumber, {
    errorHandler: errorHandler
  })
  .pipe(jshint)
  .pipe(jshint.reporter, stylish)
  .pipe(jshint.reporter, 'fail')
  .pipe(traceur);

//Compiles ES6 into ES5
gulp.task('build', function () {
  return gulp.src(paths.scripts)
    .pipe(plumber({
      errorHandler: errorHandler
    }))
    .pipe(transpilePipe())
    .pipe(gulp.dest('dist'));
});

//Transpile to ES5 and runs mocha test
gulp.task('test', ['build'], function (cb) {
  gulp.src([paths.dist])
    .pipe(plumber({
      errorHandler: errorHandler
    }))
    .pipe(istanbul())
    .on('finish', function () {
      gulp.src(paths.tests)
        .pipe(plumber({
          errorHandler: errorHandler
        }))
        .pipe(transpilePipe())
        .pipe(gulp.dest('tmp'))
        .pipe(mocha())
        .pipe(istanbul.writeReports())
        .on('end', cb);
    });
});

This replaces gulp-plumber default error handler. It allows to record any error. (Example uses Lazypipe module. It can declare reusable pipe chunks. Lazypipe isn’t integrated with gulp-plumber, so it is needed also in sub-pipe.)

Next we need error checking Gulp task. It exits process with non-zero error code to indicate error state to Gulp process environment.

gulp.task('checkError', ['test'], function () {
  if (errorOccured) {
    console.log('Error occured, exitting build process... ');
    process.exit(1);
  }
});

Finally we call error checking task at the end of main Gulp task (right before submitting test coverage to coveralls.io in this case).

gulp.task('default', ['test', 'checkError', 'coveralls']);

Watch task is pretty standard, but doesn’t stop on error now.

gulp.task('watch', function () {
  var filesToWatch = paths.tests.concat(paths.scripts);
  gulp.watch(filesToWatch, ['test']);
});

And that’s it. Drone.io CI server properly highlights errors. I can also continuously watch file changes and automatically re-run tests. I agree that solution is little bit verbose, but I can live with that until Gulp 4 will be out.

Source code for this blog post can be found on Github.

Avoid unwanted component scanning of Spring Configuration

I came through interesting problem on Stack Overflow. Brett Ryan had problem that Spring Security configuration was initialized twice. When I was looking into his code I spot the problem. Let me show show the code.

He has pretty standard Spring application (not using Spring Boot). Uses more modern Java servlet Configuration based on Spring’s AbstractAnnotationConfigDispatcherServletInitializer.

import org.springframework.web.servlet.support.AbstractAnnotationConfigDispatcherServletInitializer;

public class AppInitializer extends
		AbstractAnnotationConfigDispatcherServletInitializer {


    @Override
    protected Class<?>[] getRootConfigClasses() {
        return new Class[]{SecurityConfig.class};
    }

    @Override
    protected Class<?>[] getServletConfigClasses() {
        return new Class[]{WebConfig.class};
    }

    @Override
    protected String[] getServletMappings() {
        return new String[]{"/"};
    }

}

As you can see, there are two configuration classes:

  • SecurityConfig – holds Spring Security configuration
  • WebConfig – main Spring’s IoC container configuration
package net.lkrnac.blog.dontscanconfigurations;

import org.springframework.beans.factory.annotation.Autowired;
import org.springframework.context.annotation.Configuration;
import org.springframework.security.config.annotation.authentication.builders.AuthenticationManagerBuilder;
import org.springframework.security.config.annotation.web.configuration.WebSecurityConfigurerAdapter;
import org.springframework.security.config.annotation.web.servlet.configuration.EnableWebMvcSecurity;

@Configuration
@EnableWebMvcSecurity
public class SecurityConfig extends WebSecurityConfigurerAdapter {

    @Autowired
    public void configureGlobal(AuthenticationManagerBuilder auth) throws Exception {
        System.out.println("Spring Security init...");
        auth
                .inMemoryAuthentication()
                .withUser("user").password("password").roles("USER");
    }

}
import org.springframework.context.annotation.ComponentScan;
import org.springframework.context.annotation.Configuration;
import org.springframework.web.servlet.config.annotation.EnableWebMvc;
import org.springframework.web.servlet.config.annotation.WebMvcConfigurerAdapter;

@Configuration
@EnableWebMvc
@ComponentScan(basePackages = "net.lkrnac.blog.dontscanconfigurations")
public class WebConfig extends WebMvcConfigurerAdapter {

}

Pay attention to the component scanning in WebConfig. It is scanning package where all three classes are located. When you run this on servlet container, text “Spring Security init…” is written to console twice. It mean mean SecurityConfig configuration is loaded twice. It was loaded

  1. During initialization of servlet container in method AppInitializer.getRootConfigClasses()
  2. By component scan in class WebConfig

Why? I found this explanation in Spring’s documentation:

Remember that @Configuration classes are meta-annotated with @Component, so they are candidates for component-scanning!

So this is feature of Spring and therefore we want to avoid component scanning of Spring @Configuration used by Servlet configuration. Brett Ryan independently found this problem and showed his solution in mentioned Stack Overflow question:

@ComponentScan(
    basePackages = "com.acme.app",
    excludeFilters = {
        @Filter(
            type = ASSIGNABLE_TYPE,
            value = { WebConfig.class, SecurityConfig.class }
        )
    })

I don’t like this solution. Annotation is too verbose for me. Also some developer can create new @Configuration class and forget to include it into this filter. I would rather specify special package that would be excluded from Spring’s component scanning.

I created sample project on Github so that you can play with it.

Mastering Unit Testing Using Mockito and JUnit

Book Review: Mastering Unit Testing Using Mockito and JUnit

I was asked by Packt Publishing to write a review blog post about the new book Mastering Unit Testing Using Mockito and JUnit by Sujoy Acharya (released in Jun 2014). As I am passionate about all topics around testing or continuous development, I got exited. Nice side effect of this is that I could read this book for free ;). Book is 314 pages long. Divided into 10 chapters.

Preface

Summarizes why reader wants to test. Also why wants to have automated feedback loop. But there was very strong statement: “Greenfield projects always follow test-driven development to deliver maintainable and testable code.” Of course author probably wrote this before test first / test last battle. I am personally also TDD infected but there are definitely situations where it doesn’t make sense to do test first or test at all (e.g. prototyping). Also we should accept existence of test last approach. There are certainly very strong TDD opponents:

Chapter 1: JUnit4 – A Total recall

Guides reader how to create simple project in Eclipse. Leads him through JUnit features. It starts with basic fundamentals. Later in the chapter are described advanced parts of JUnit API. Some of these parts of the API should be used rarely or not at all (e.g. test methods ordering). This would be worth mentioning for beginners.  I wasn’t very excited because I am TestNG user. If you ever wrote some unit tests you probably would want to skip this chapter. Surprising for me was comparison of JUnit 4 @Before annotation with JUnit 3 setUp(). JUnit 4 is already 8 years old.

Chapter 2: Automating JUnit Tests

Elaborates about Continuous Integration. Also provides basic information about Gradle, Maven and Ant. Demonstrates very simple configurations of each build tool and how they run tests. Lastly touches simple Jenkins integration with each mentioned tool. Shame that configuration of examples across the book weren’t driven by any of this build tools.

Chapter 3:  Test Doubles

Brief explanation of theory behind faking dependencies of testing object. It also contains examples of each type (without usage of any testing framework so far).

Chapter 4: Progressive Mockito

Demonstrates Mockito syntax on examples. It goes through basic and also advanced Mockito features. At the end of the chapter is mentioned BDD (Behavioral driven development) style of testing. The only disturbing moment was manual inclusion of dependencies in example project configuration. Build tools were discussed in Chaper 2.

Chapter 5: Exploring Code Coverage

Author explains what code coverage means. After that shows some ways how to measure code coverage from Eclipse. I was surprised that he still accepts Cobertura as relevant tool, because Cobertura is dead project now. Last version was working only for Java 6. Java 6 was marked as “End of life” more that a year ago. That is why integration examples of Cobertura with Ant and Maven aren’t very useful. Examples how to integrate them with JaCoCo would be much more appropriate. I integrated JaCoCo with Maven in the past. It’s definitely doable.

EDIT: Cobertura is again under active development and is working for Java 7 now.

Chapter 6: Revealing Code Quality

This chapter shows three very useful Java static code analyzers

  • PMD
  • FindBugs
  • CheckStyle

Than it introduces SonarQube and its integration with mentioned build tools. It is very handy tool for monitoring technical depth on the project.

Chapter 7: Unit Testing the Web Tier

Some examples how you can test

  • Servlets
  • Spring MVC

But Spring MVC examples with Spring Test’s MockMvc library are missing. Examples in this chapter contain only plain Mockito + JUnit libraries. Readers should definitely take a look at MockMvc capabilities, because they are much more handier than explained approach.

Chapter 8: Playing with Data

This time author focuses on DAO layer. My personal opinion is that mocking Connetion or PreparedStatement in tests isn’t quite right. You can have test passing, but when you execute SQL statement against DB it can fail on some SQL error. I prefer to have integration tests for DAO layer.

Chapter 9: Solving Test Puzzles

Discusses constructs known as testability killers and some approaches how to solve them. I also discussed this topic in blog post series. I am glad that author doesn’t suggest usage of PowerMock. Rather takes the path of changing production code to enhance testability. Totally agree. Finally it shows example of TDD style of programming. Shame that this is the only example in the book where test is introduced before production code. So all other examples doesn’t follow TDD.

Chapter 10: Best Practices

This chapter dives into some common pitfalls reader can fall during writing the tests. Such advices are always good to keep in mind.

Conclusion

“Mastering Unit Testing Using Mockito and JUnit” book declares that was written for advanced to novice software testers and developers who use Mockito and JUnit framework. I would say that is only for beginners. It is mainly because book is covering wide range of topics around testing and its automation. There isn’t enough place dive deeply. Positive is covering nearly all aspects of professional unit testing. So it is very good start for developers that are willing to explore benefits of automated feedback loop. Author takes approach of hands on examples, so it is much better to read it next to the computer.

eclipse-pmd

eclipse-pmd – New PMD plugin for Eclipse

I am Eclipse user. So when I wanted to analyze my code by PMD, I needed to use “PMD for Eclipse” plugin. This plugin used to be very buggy, which was enhanced in later versions (currently 4.0.3). But the performance is really bad sometimes. Especially when you are dealing with relatively big codebase and have option “Check code after Saving” on.

ecplise-pmd plugin

So when I realized that there is new alternative PMD plugin called eclipse-pmd out there I evaluated it immediately with great happiness.

Installation uses modern Eclipse Marketplace method. You just need to go “Help” -> “Eclipse Marketplace…” and search for “eclipse-pmd”. Than hit “Install” and follow instructions.

After installation I was a little bit confused because I didn’t find any configuration options it general settings (“Window” -> “Preferences”). I discovered that you need to turn on PMD for each project separately. Which make sense, because you can have different rule set per project. So to turn it on, right click on project -> “Preferences” -> “PMD” (there would be two PMD sections if you didn’t uninstall old PMD plugin)-> “Enable PMD for this project” -> “Add…”. Now you should pick a location of PMD ruleset file.

pick-ruleset

Unlike old PMD plugin, eclipse-pmd don’t import ruleset. It is using ruleset file directly. This is very handy, because typically you want to have it in source control. When you pull changes to ruleset file from source control system, they are applied without re-import (re-import was needed for old PMD plugin).

Problem can be when you (or your team) don’t have existing ruleset. I would suggest to start with full ruleset and exclude rules you don’t want to use. Your ruleset would evolve anyway, so starting with most restrictive (default) deck make perfect sense for me. Unfortunately eclipse-pmd plugin doesn’t provide option to generate ruleset file. So I created full ruleset for PMD 5.1.1 (5.1.1 is PMD version not plugin version). I have to admit that it was created with help of old PMD plugin.

You can see that I literally included all the rule categories. I would suggest to specify your set this way and exclude/configure rules explicitly as needed. Here is link to PMD site that explains how to customize your ruleset. This approach can be handy when PMD version will be updated. New rules can appear in category and they will be automatically included into your ruleset when you are listing categories, not rules individually. But you have to keep eye on new rules/categories when updating PMD version anyway, because categories often change with new PMD version.

So now we should have rulset configured and working. Here are some screen shots of rules in action:

When you hover over left side panel warning:

eclipse-pmd

When you hover over problematic snippet:

eclipse-pmd

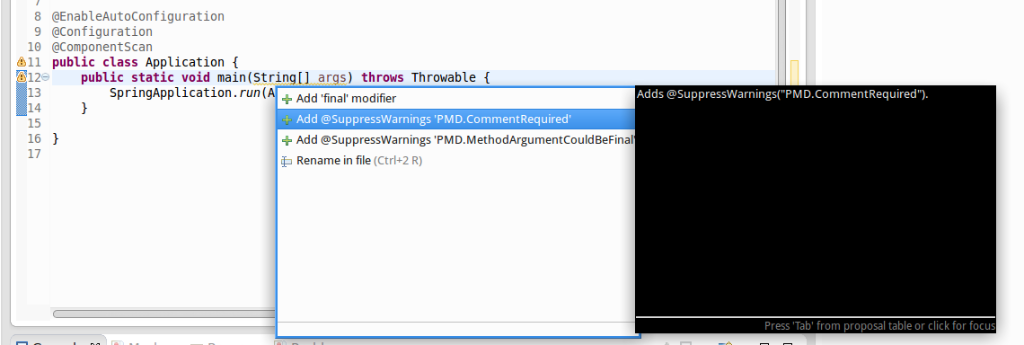
When you do quick fix on problematic snippet:

eclipse-pmd

Generating suppress warning annotation for PMD rules is very nice feature. It also provide quick fixes for some rules. Take a look at its change log site for full list.

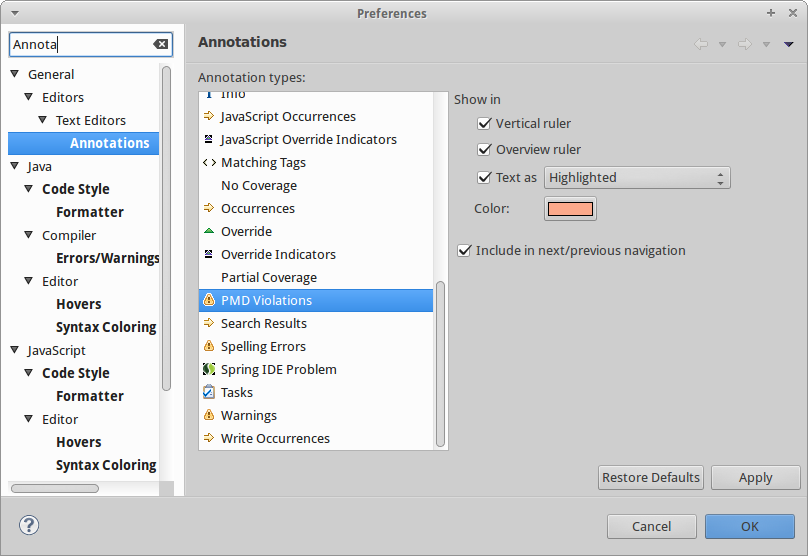
These PMD warning sometimes clash with Eclipse native warnings, so there is possibility to make them more visible. Go to “Window” -> “Preferences” -> “General” -> “Editors” -> “Text Editors” -> “Annotations” and find “PMD Violations”.

eclipse-pmd

Here you can configure your own style of highlighting PMD issues. This is mine:

eclipse-pmd

To explore full feature list of this plugin take a look at its change log site.

There are some features in old plugin I miss though. For example I would appreciate some quick link or full description of the rule. Short description provided is sometimes not enough. I encourage you to take a look at full PMD rule description if you are not sure what’s source of the problem. You will learn a lot about Java language itself or about libraries you are using. Quick links would help a lot in such case.

Also some rules doesn’t use code highlighting (only side panel markers). It is sometimes hard to distinguish between compiler and PMD issues. This is problem for me because our team doesn’t use JavaDoc warnings but I do. So I get a lot of JavaDoc warnings from code written by teammates. And sometimes I can miss PMD issue because it is lost in JavaDoc warnings. (Fortunately SVN commit is rejected if I forget to fix some rule).

Conclusion

This plugin enhanced my Eclipse workflow. No more disruptions because of endless “Checking code…” processing by old plugin.