How to verify equality without equals method

I don’t like equals method. It often requires very ugly code. Therefore I try to avoid need for it as much as possible. But how to compare objects during testing? This blog post will cover it.

You may argue, that there are various possibilities to generate equals method or make it more maintainable. For example:

But what about testing it? I met so many developers that were surprised after hearing about unit testing of equals method. So should we unit test it? YES, of course! If it’s generated by IDE, it often has a lot of null check if statements. Testing such code means covering a lot of test scenarios. Also static code analyzer will probably complain about cyclomatic complexity violations.

If you are using object with custom equals method in HashMap or HashSet, we need to conform to hashCode vs equals contract. Eventual issues in this contract can lead into very tricky behavior of our map or set. Therefore I rather use some unique String or numeric representation as key in the map so that I don’t need to create equals. HashSet is type I try to avoid completely.

So if most common reasons for creating equals method for production code are avoided, what about testing? Verifications in tests often require to compare if objects have fields with same values. Of course it doesn’t make sense to create equals only for testing assertions. Sometimes we also have nested types to compare. And what about comparison of arrays or lists during testing?

Luckily there is very neat library called Unitils. It provides various testing helpers for Hibernate, Database and I/O testing or mocking. But I was using only module called Reflection assert. It makes comparison of Java objects during testing piece of cake.

Example Objects

package net.lkrnac.blog.reflectioncompare;

public class Address {
    private String line1;
    private String line2;
    private String city;
    private String postalCode;

    public Address(String line1, String line2, String city, String postalCode) {
        this.line1 = line1;
        this.line2 = line2;
        this.city = city;
        this.postalCode = postalCode;
    }

    public String getLine1() {
        return line1;
    }

    public String getLine2() {
        return line2;
    }

    public String getCity() {
        return city;
    }

    public String getPostalCode() {
        return postalCode;
    }
}
package net.lkrnac.blog.reflectioncompare;

public class Person {
    private String firstName;
    private String lastName;
    private Address address;

    public Person(String firstName, String lastName, Address address) {
        this.firstName = firstName;
        this.lastName = lastName;
        this.address = address;
    }

    public String getFirstName() {
        return firstName;
    }

    public String getLastName() {
        return lastName;
    }

    public Address getAddress() {
        return address;
    }
}

Notice that Address is nested field in Person class.

Reflection equals verification

Now let’s take a look how we would compare instances of above listed types.

package net.lkrnac.blog.reflectioncompare;

import org.junit.Test;

import static org.unitils.reflectionassert.ReflectionAssert.assertReflectionEquals;

public class VerifyObjectsTest {
    @Test
    public void testObjectsSuccess() {
        Address expectedAddress = new Address("Barad-dûr", "Mount Doom", "Mordor", "1");
        Person expectedPerson = new Person("Sauron", null, expectedAddress);

        Address actualAddress = new Address("Barad-dûr", "Mount Doom", "Mordor", "1");
        Person actualPerson = new Person("Sauron", null, actualAddress);

        assertReflectionEquals(expectedPerson, actualPerson);
    }

    @Test
    public void testObjectsFail() {
        Address expectedAddress = new Address("Barad-dûr", null, "Mordor", "1");
        Person expectedPerson = new Person("Sauron", null, expectedAddress);

        Address actualAddress = new Address("Barad-dûr", "Mount Doom", "Mordor", "1");
        Person actualPerson = new Person("Sauron", null, actualAddress);

        assertReflectionEquals(expectedPerson, actualPerson);
    }
}

First test method created two separate instances of Person and compares them. Second test method intentionally creates difference in nested Address field between actual and expected, so that we can explore Unitils output:

junit.framework.AssertionFailedError: 
Expected: Person<firstName="Sauron", lastName=null, address=Address<line1="Barad-dûr", line2=null, city="Mordor", postalCode="1">>
  Actual: Person<firstName="Sauron", lastName=null, address=Address<line1="Barad-dûr", line2="Mount Doom", city="Mordor", postalCode="1">>

--- Found following differences ---
address.line2: expected: null, actual: "Mount Doom"

--- Difference detail tree ---
 expected: Person<firstName="Sauron", lastName=null, address=Address<line1="Barad-dûr", line2=null, city="Mordor", postalCode="1">>
   actual: Person<firstName="Sauron", lastName=null, address=Address<line1="Barad-dûr", line2="Mount Doom", city="Mordor", postalCode="1">>

address expected: Address<line1="Barad-dûr", line2=null, city="Mordor", postalCode="1">
address   actual: Address<line1="Barad-dûr", line2="Mount Doom", city="Mordor", postalCode="1">

address.line2 expected: null
address.line2   actual: "Mount Doom"

Very nice output making the nested difference very obvious.

Comparison of arrays and collections

Another very useful use case of Unitils Reflections assert module is comparison of arrays and collections:

package net.lkrnac.blog.reflectioncompare;

import org.junit.Test;
import org.unitils.reflectionassert.ReflectionComparatorMode;

import static java.util.Arrays.asList;
import static org.unitils.reflectionassert.ReflectionAssert.assertReflectionEquals;

public class VerifyArraysTest {

    @Test
    public void testCompareArraysSuccess() {
        String [] expectedArray = new String []{"string1", "string2", "string3"};
        String [] actualArray = new String []{"string1", "string3", "string2"};

        assertReflectionEquals(expectedArray, actualArray, ReflectionComparatorMode.LENIENT_ORDER);
    }

    @Test
    public void testCompareArraysFail() {
        String [] expectedArray = new String []{"string1", "string2", "string3"};
        String [] actualArray = new String []{"string1", "string3", "string2"};

        assertReflectionEquals(expectedArray, actualArray);
    }

    @Test
    public void testCompareCollectionsSuccess() {
        String [] expectedArray = new String []{"string1", "string2", "string3"};
        String [] actualArray = new String []{"string1", "string3", "string2"};

        assertReflectionEquals(asList(expectedArray), asList(actualArray), ReflectionComparatorMode.LENIENT_ORDER);
    }

    @Test
    public void testCompareCollectionsFail() {
        String [] expectedArray = new String []{"string1", "string2", "string3"};
        String [] actualArray = new String []{"string1", "string3", "string2"};

        assertReflectionEquals(asList(expectedArray), asList(actualArray));
    }
}

First test method is comparing arrays. It will succeed, because we instructed Unitils to ignore order of elements with parameter ReflectionComparatorMode.LENIENT_ORDER. In second test method, we don’t use reflection comparator mode parameter, so order matters. Because it’s is different for actual and expected arrays, test will fail with this output:

junit.framework.AssertionFailedError: 
Expected: ["string1", "string2", "string3"]
  Actual: ["string1", "string3", "string2"]

--- Found following differences ---
[1]: expected: "string2", actual: "string3"
[2]: expected: "string3", actual: "string2"

--- Difference detail tree ---
 expected: ["string1", "string2", "string3"]
   actual: ["string1", "string3", "string2"]

[1] expected: "string2"
[1]   actual: "string3"

[2] expected: "string3"
[2]   actual: "string2"

Again very detailed output about test failure.

Lastly there are also included test methods comparing lists. So Unitils Reflection assert module can be easily used also for Java collections.

Example code is hosted on Github.

Verifying DateTime and Date with Hamcrest

Since I started diving into automated testing and practicing TDD, verification of date values was pain. Luckily there is nice library for legacy Date and new Java 8 DateTime APIs, which cures this pain.

If you belong to healthier part of Java development community and practicing unit testing on daily basis, you probably are aware of Hamcrest Java library. It can make your tests much more readable. It’s architecture is very modular and is used by various other testing libraries.

Major part of it’s flexibility is it concept of Matcher. I am not going to dive into this concept now. If you are not familiar, just take a quick look at Hamcrest tutorial. One of the matcher you can plug into your testing toolbox is library hamcrest-date. With this library we can easily test that date was generated within certain range:

    @Test
    public void validateDate() {
        //GIVEN
        Date expectedDate = new Date();

        //WHEN
        Date actualDate = new Date();

        //THEN
        assertThat(actualDate, DateMatchers.within(2, ChronoUnit.SECONDS, expectedDate));
    }

We can do that also for Java 8 types:

    @Test
    public void validateDateTime() {
        //GIVEN
        LocalDateTime expectedDateTime = LocalDateTime.now();

        //WHEN
        LocalDateTime actualDateTime = LocalDateTime.now();

        //THEN
        assertThat(actualDateTime, LocalDateTimeMatchers.within(2, ChronoUnit.SECONDS, expectedDateTime));
    }

Or pick various exotic verifications hamcrest-core library provides:

    @Test
    public void validateZonedDateTime() {
        //GIVEN
        ZonedDateTime expectedDateTime = ZonedDateTime.of(2016, 3, 20, 13, 3, 0, 0, ZoneId.of("GMT+1"));

        //WHEN
        ZonedDateTime actualDateTime = ZonedDateTime.of(2016, 3, 20, 13, 3, 0, 0, ZoneId.of("GMT-0"));

        //THEN
        assertThat(actualDateTime, ZonedDateTimeMatchers.sameDay(expectedDateTime));
        assertThat(actualDateTime, ZonedDateTimeMatchers.after(expectedDateTime));
        assertThat(actualDateTime, ZonedDateTimeMatchers.isSunday());
        assertThat(actualDateTime, ZonedDateTimeMatchers.isMarch());
    }

Kudos to creator for this nice little library. This example is hosted in Github.

Create UML diagrams with simple DSL – PlantUML

Historically I disliked creating design UML diagrams, because the tooling for it mostly requires drawing boxes and connecting them with lines or arrows. I find such workflow very time consuming and wasteful. This short blog post will describe much better way to create UML diagrams.

But first of all, you may argue that UML importance in today’s agile software development world is fading out. I would agree partially.

Creating UML Class Diagrams

From my point of view UML class diagrams are needed very rarely. I can find only two use cases for it:

  • To analyze existing code base
  • To communicate suggested design with the team

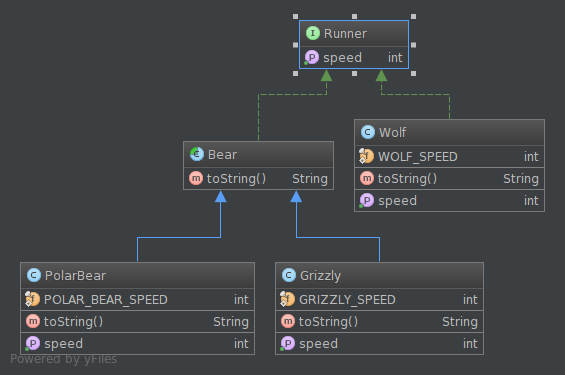
When you need to analyze existing code base, class diagrams can be easily generated by your IDE from the existing code. IntelliJ idea provides this as part of payed version:

UML

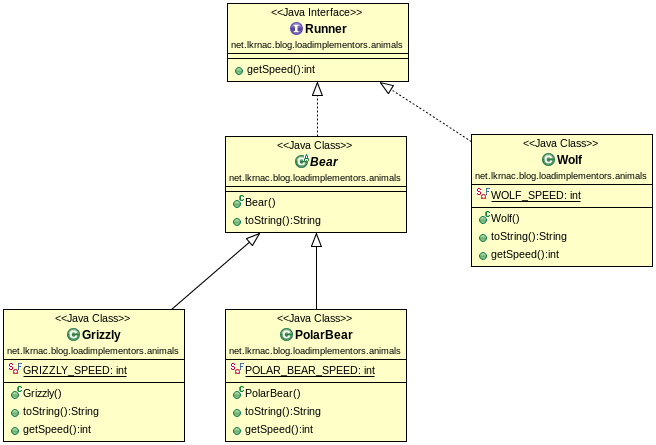
To find out how to create such diagram, read this IntelliJ IDEA documentation. It is also easy with Eclipse or it’s flavors (e.g. Spring Tool Suite):

UML

You just need to use plugin called ObjectAid.

When we need to sketch class diagram upfront to consult design with the team, I would suggest to create prototype with desired class structure instead and generate class diagram from the live code (again with IDE). You may find some important facts about the design while creating prototype. There’s no need to create logic and tests, just APIs of the design.

And of course when you don’t need such generated diagram anymore, just wipe it out. Low level design may change easily and you don’t want to keep outdated diagrams around. You can generate new diagram from live code easily.

Non-Class diagrams

So when we need Class diagram, it’s smart to generate it from live code. But what about other UML diagrams like:

  • Structure diagrams (except Class diagram)
  • Behavioral diagrams
  • Interaction diagrams (especially useful is Sequence diagram from this bucket)

I personally created only few Use case and Flow chart diagrams during my career. But Sequence and Component diagrams are very useful to document high-level design decisions. Of course you don’t want to have them very detailed, but at high level designer intentions and considerations are sometimes good to document.

But the tool that is used for designing these diagrams has to be very easy to use and flexible. Sorry Visio or Enterprise Architect, I don’t include you into this bucket (although I have to admin I haven’t use EA for long time).

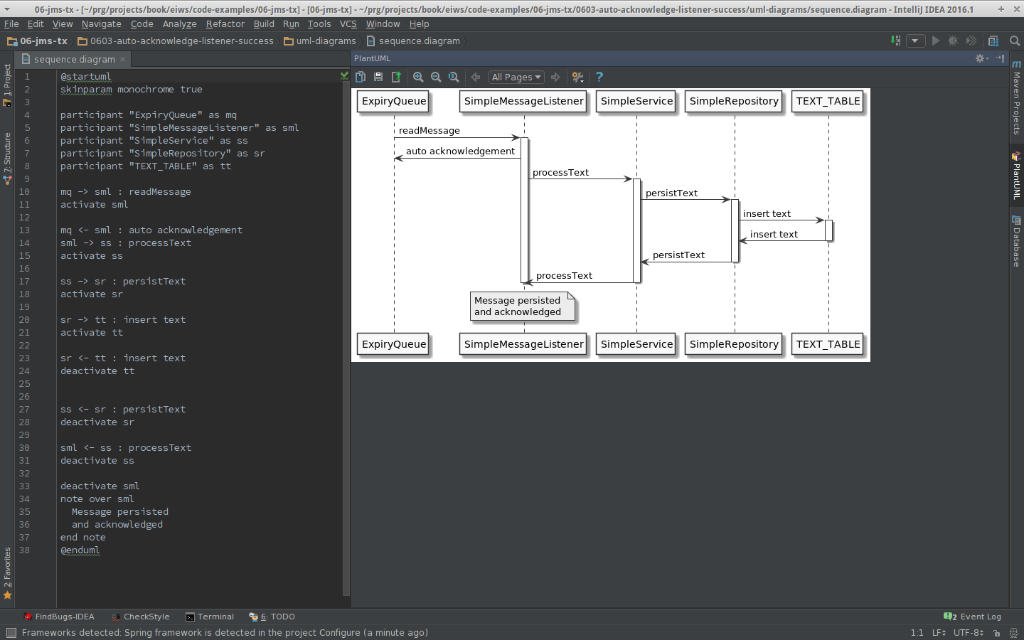
My tool of choice it PlantUML.  We can define design with very simple DSL. Therefore instead of connecting boxes and lines on canvas, we can focus on design itself. It can be used as standalone application but it also have impressive list of integrations. So you can easily use it with your IntelliJ IDEA, Eclipse or Spring Tool Suite.

Very compelling fact for me, is that DSL which defines diagrams can live with the project code-base and also be handled by source control system, with all the goodness it brings. This is simple screenshot from IntelliJ:

UML
Selenium Travis

Speed up Gradle build on TravisCI

I was recently speeding up Gradle build on TravisCI for one Dotsub project. It builds Spring Boot based project (written in Java), but also uses Gulp sub-tasks on top of NodeJS to bundle front-end code and assets. This blog post is about sharing these small build optimization hints. They are also shared in this Github repository.

Default TravisCI configuration for Gradle

By default, when Travis detects Gradle as build system it configures these two phases by default:

install: gradle assemble
build: gradle check

So as part of your build, Gradle is executed twice by default. And it also does make some sense when you take a look at how Gradle Java plugin works:

Gradle Java plugin tasks

As you can see assemble and check phases has only few initial phases in common. There isn’t much tasks redundancy if we run assemble and check separately.

There is also Gradle UP-TO-DATE feature. It means Gradle is smart enough to mark task as UP-TO-DATE after first execution. Redundant execution of this task can be than skipped if its input doesn’t change. Of course it works across various separate build executions. Let’s take a look at what happen when we build mentioned example project with this example configuration. Link to build is here.

$ ./gradlew assemble
:compileJava
:processResources
:classes
:findMainClass
:jar
:bootRepackage
:assemble

BUILD SUCCESSFUL

Total time: 21.0 secs

$ ./gradlew check
:compileJava UP-TO-DATE
:processResources UP-TO-DATE
:classes UP-TO-DATE
:compileTestJava
:processTestResources UP-TO-DATE
:testClasses
:test
2016-02-06 11:26:06.883  INFO 2455 --- [       Thread-6] ationConfigEmbeddedWebApplicationContext : Closing org.springframework.boot.context.embedded.AnnotationConfigEmbeddedWebApplicationContext@295c442d: startup date [Sat Feb 06 11:25:47 UTC 2016]; root of context hierarchy
:check

BUILD SUCCESSFUL

Total time: 55.216 secs

Notice that Full elapsed time was 1 min 49 seconds.

As you can see execution of check task didn’t have to run tasks compileJava, processResources and classes again, because they were executed previously as part of assemble task.

So TravisCI default configuration may seem reasonable for Gradle.

Merge install and script phase

But even if Gradle makes best effort to reduce overhead, the overhead is there. As Gradle Java Plugin tasks visualization showed earlier in the blog post, we can cover assemble and check tasks with build task. So why should we run two Gradle processes in single build when single process execution is enough?

Also mentioned two default tasks may be fine for Continuous Integration workflow, but modern developers and teams doesn’t stop there. Every company that takes software development seriously wants to incorporate Continuous Delivery or Continuous Deployment. So we want to assemble, check, build and deploy all our assets in one build pipeline. So why would we want to run two Gradle processes?

Let’s do this:

install: echo "skip 'gradle assemble' step"
script: gradle build --continue

In Travis Install phase we override default assemble task and run full Gradle build as one process. Let take a look at timings of such build for very same example project. Build link is here.

$ echo "skip './gradlew assemble' step"
skip './gradlew assemble' step
$ ./gradlew build --continue
:compileJava
:processResources
:classes
:findMainClass
:jar
:bootRepackage
:assemble
:compileTestJava
:processTestResources UP-TO-DATE
:testClasses
:test
2016-01-31 20:19:37.202  INFO 2353 --- [       Thread-6] ationConfigEmbeddedWebApplicationContext : Closing org.springframework.boot.context.embedded.AnnotationConfigEmbeddedWebApplicationContext@46441da4: startup date [Sun Jan 31 20:19:24 UTC 2016]; root of context hierarchy
:check
:build

BUILD SUCCESSFUL

Total time: 36.926 secs

Notice that Full elapsed time was 59 seconds.

So even if Gradle tries to optimize tasks as much as possible, there is noticeable overhead running two separate Gradle processed instead of two.

Cache Gradle and NodeJS dependencies

Second hint to speed up TravisCI build for Gradle can be found in TravisCI docs itself. It involves Gradle dependencies caching.

As I mentioned at the beginning, project I work on also involves Gulp/NodeJS build. Therefore it make sense to put also NPM dependencies into TravisCI cache. Gradle integration with Gulp can be done via Gradle Gulp plugin. This plugin locates NPM global dependencies into $HOME/.gradle/nodejs and local NPM depndencies into node_modules folder.

So full of Gradle caching configuration for our build looks like this:

before_cache:
  - rm -f $HOME/.gradle/caches/modules-2/modules-2.lock
cache:
  directories:
    - $HOME/.gradle/caches/
    - $HOME/.gradle/wrapper/
    - $HOME/.gradle/nodejs/
    - node_modules

Don’t ask me why we need to remove lock in before_cache section. That is taken from mentioned TravisCI docs. Rest of the configuration caches all Gradle and NPM dependencies between builds.

Here is link to build without this caching: 1 min 56 seconds

Here is link to build with this caching: 59 seconds. This example build doesn’t contain Gradle Gulp plugin, so saving from NPM dependencies caching are not included.

Conclusion

These two simple tricks cut off around 4 minutes from Dotsub project build I mentioned. Pretty nice when it’s for free. If you want to mess with this example, you can look at this Github repo.

Selenium tests on Gradle in Travis

Run Selenium tests on TravisCI

Stack of application I am currently working on at Dotsub is based on Java/Spring Boot back-end and React/Redux front-end. To have confidence that this application works end to end, we are using Selenium tests. It is very easy to run them as part application build, because Spring Boot testing support allows to run full application as part of application build. We use Gradle as main build system and it is all running on Travis continuous integration server. To demonstrate this approach for end to end testing I created small Hello World project on GitHub.

Build

Build system of choice is Gradle. Creation of following Gradle script was very easy, because I used Spring Initializr:

buildscript {
	ext {
		springBootVersion = '1.3.2.RELEASE'
	}
	repositories {
		mavenCentral()
	}
	dependencies {
		classpath("org.springframework.boot:spring-boot-gradle-plugin:${springBootVersion}")
	}
}

apply plugin: 'java'
apply plugin: 'idea'
apply plugin: 'spring-boot'

jar {
	baseName = 'blog-2016-01-selenium-on-travis'
	version = '0.0.1-SNAPSHOT'
}

sourceCompatibility = 1.8
targetCompatibility = 1.8

repositories {
	mavenCentral()
}


dependencies {
	compile('org.springframework.boot:spring-boot-starter')
	compile('org.springframework.boot:spring-boot-starter-web')
	testCompile('org.springframework.boot:spring-boot-starter-test')
    testCompile("org.seleniumhq.selenium:selenium-firefox-driver:2.49.0")
    testCompile('org.seleniumhq.selenium:selenium-support:2.49.0')
}

task wrapper(type: Wrapper) {
	gradleVersion = '2.9'
}

The only additional dependencies against generated script (by Spring Initializr) are Selenium, Firefox Selenium driver and Spring Starter Web. Adding spring-boot-starter-web into build will transform our project into web application with embedded Tomcat servlet container.

Hello World Application

To demonstrate Selenium Tests automation, I created very simple application code. First of all we need Spring Boot main class:

package net.lkrnac.blog.seleniumontravis;

import org.springframework.boot.SpringApplication;
import org.springframework.boot.autoconfigure.SpringBootApplication;

@SpringBootApplication
public class Application {
    public static void main(String... args){
        SpringApplication.run(Application.class);
    }
}

It is very standard Spring Boot construct for Spring context initialization.  Annotation @SpringBootApplication turns on Spring Boot auto-configuration. It sets up most sensible defaults for out application, which is most importantly embedded servlet container in this case.

Second part of our simple application code is front-end code. For demonstration purposes this simplest React example (taken from React getting started guide) will be enough:

<!DOCTYPE html>
<html>

<head>
    <meta charset="UTF-8" />
    <title>Hello React!</title>
    <script src="https://cdnjs.cloudflare.com/ajax/libs/react/0.14.7/react.min.js"></script>
    <script src="https://cdnjs.cloudflare.com/ajax/libs/react/0.14.7/react-dom.min.js"></script>
    <script src="https://cdnjs.cloudflare.com/ajax/libs/babel-core/5.8.23/browser.min.js"></script>
</head>

<body>
<div id="hello" />

<script type="text/babel">
    ReactDOM.render(
    <h1>Hello, world!</h1>, document.getElementById('hello') );
</script>
</body>

</html>

It uses Babel to transpile JSX inline and pulls React libraries from CDN. It doesn’t do any AJAX calls to server. We also didn’t create any Spring controller for serving requests. It is because goal of this example is to demonstrate Selenium testing against React+Spring Boot app, therefore I skipped communication between client and server.

This simple HTML + React Hello World page is located in file src/main/resources/static/index.html, where it will be picked up by Spring Boot and exposed as default web page content when request hits root URL of embedded servlet container.

Simple Selenium Test

Following listing shows how can we approach selenium testing against Spring Boot application:

import net.lkrnac.blog.seleniumontravis.Application;
import org.junit.AfterClass;
import org.junit.BeforeClass;
import org.junit.Test;
import org.junit.runner.RunWith;
import org.openqa.selenium.By;
import org.openqa.selenium.firefox.FirefoxDriver;
import org.openqa.selenium.support.ui.ExpectedConditions;
import org.openqa.selenium.support.ui.WebDriverWait;
import org.springframework.boot.test.SpringApplicationConfiguration;
import org.springframework.boot.test.WebIntegrationTest;
import org.springframework.test.context.junit4.SpringJUnit4ClassRunner;

import java.io.IOException;

@RunWith(SpringJUnit4ClassRunner.class)
@SpringApplicationConfiguration(Application.class)
@WebIntegrationTest
public class ApplicationTest {
    private static FirefoxDriver driver;

    @BeforeClass
    public static void setUp() throws IOException {
        driver = new FirefoxDriver();
    }

    @Test
    public void contextLoads() {
        driver.get("https://localhost:8080");
        WebDriverWait wait = new WebDriverWait(driver, 10);
        wait.until(ExpectedConditions.textToBePresentInElementLocated(
                By.id("hello"), "Hello, world!"));
    }

    @AfterClass
    public static void tearDown() {
        driver.quit();
    }
}

Before test, it starts Firefox Selenium driver. During test it visits default specified address https://localhost:8080. This should hit our index.html. Next phase of the test is waiting for Hello, world! header to be rendered on screen. After this happens, test is done and Selenium driver is closed. When we run this test locally, we can see following pop-up appear on the screen.

Selenoum Tests

Travis Configuration

Last piece of this example it TravisCI configuration manifest. Relevant parts of it are here:

language: java
jdk:
  - oraclejdk8

before_script:
  - "export DISPLAY=:99.0"
  - "sh -e /etc/init.d/xvfb start"
  - sleep 3 # give xvfb some time to start

script: ./gradlew build --continue

First of all we specify that Java 8 is our language of choice. Before script part is taken from TravisCI docs. It starts Xvfb (X virtual frame buffer), which simulates X11 display server on Linux machine without screen. This allows render our site virtually, because TravisCI build machine contains installation of Firefox by default. This configuration is enough for Selenium tests. In script phase we start full Gradle build.

Possible Travis problems and solution

All this configuration may be enough for you to start simple Selenium testing again React application. But default Firefox version on TravisCI machine is 31.0 ESR. This is quite old version and some of our React pages may not be rendered correctly during the build. Luckily TravisCI allows to update Firefox version with this simple manifest declaration:

addons:
  firefox: "44.0"

This installs new version of Firefox on TravisCI, but unfortunately it is not enough because of this open TravisCI issue. Consequence is that default configuration of Selenium Firefox driver configuration use old Firefox binary instead of new one.

But when I executed which firefox command on Travis, it was pointing to new binary file. Therefore I used this Selenium Driver initialization to pick up newer Firefox binary on Travis:

import net.lkrnac.blog.seleniumontravis.Application;
import org.junit.AfterClass;
import org.junit.BeforeClass;
import org.junit.Test;
import org.junit.runner.RunWith;
import org.openqa.selenium.By;
import org.openqa.selenium.firefox.FirefoxBinary;
import org.openqa.selenium.firefox.FirefoxDriver;
import org.openqa.selenium.firefox.FirefoxProfile;
import org.openqa.selenium.support.ui.ExpectedConditions;
import org.openqa.selenium.support.ui.WebDriverWait;
import org.slf4j.Logger;
import org.slf4j.LoggerFactory;
import org.springframework.boot.test.SpringApplicationConfiguration;
import org.springframework.boot.test.WebIntegrationTest;
import org.springframework.test.context.junit4.SpringJUnit4ClassRunner;

import java.io.BufferedReader;
import java.io.File;
import java.io.IOException;
import java.io.InputStreamReader;

@RunWith(SpringJUnit4ClassRunner.class)
@SpringApplicationConfiguration(Application.class)
@WebIntegrationTest
public class UseNewFirefoxOnTravisTest {
    private static FirefoxDriver driver;

    @BeforeClass
    public static void setUp() throws IOException {
        String travisCiFlag = System.getenv().get("TRAVIS");
        FirefoxBinary firefoxBinary = "true".equals(travisCiFlag)
                ? getFirefoxBinaryForTravisCi()
                : new FirefoxBinary();

        driver = new FirefoxDriver(firefoxBinary, new FirefoxProfile());
    }

    private static FirefoxBinary getFirefoxBinaryForTravisCi() throws IOException {
        String firefoxPath = getFirefoxPath();
        Logger staticLog = LoggerFactory.getLogger(UseNewFirefoxOnTravisTest.class);
        staticLog.info("Firefox path: " + firefoxPath);

        return new FirefoxBinary(new File(firefoxPath));
    }

    private static String getFirefoxPath() throws IOException {
        ProcessBuilder pb = new ProcessBuilder("which", "firefox");
        pb.redirectErrorStream(true);
        Process process = pb.start();
        try (InputStreamReader isr = new InputStreamReader(process.getInputStream(), "UTF-8");
             BufferedReader br = new BufferedReader(isr)) {
            return br.readLine();
        }
    }

    @Test
    public void contextLoads() {
        driver.get("https://localhost:8080");
        WebDriverWait wait = new WebDriverWait(driver, 10);
        wait.until(ExpectedConditions.textToBePresentInElementLocated(
                By.id("hello"),
                "Hello, world!")
        );
    }

    @AfterClass
    public static void tearDown() {
        driver.quit();
    }
}

Testing logic is the same as for example test we already introduced. Different is initialization of Firefox Selenium driver. In this case we first recognize if we are running in Travis environment via environment variable TRAVIS. If we are not running in Travis, we use default Firefox driver initialization.

If we are running in TravisCI build, we use standard Java class ProcessBuilder to execute Linux command which firefox in separate process and grab it’s output. This gives us path of newer Firefox binary. Based on this path, we initialize Firefox Selenium driver and are good to automatically run Selenium test against latest Firefox on TravisCI build machine.

Source code for this example is located in GitHub.