Tag Archives: Spring Boot

Page Object pattern example

This blog post will provide example of end-to-end Selenium tests in Java with usage of Page Object pattern.

Every responsible developer knows that end-to-end test is necessary at some point. When you want to test web application end-to-end, there is only one decent open-source option: Selenium. Of course end-to-end test suite have to be maintainable. To achieve that, I believe we have to use Page Object pattern for each web screen present in web application. Martin Fowler’s link explains very well benefits of this pattern, therefore I skip theory.

We at Dotsub are using Java platform with Spring Boot for back-end. Therefore Java Selenium APIs were natural fit for our needs. This blog post will explain Page Object pattern on application built with Spring Boot. For UI, it will use famous Dan Abramov’s Todos  example. This example was used for Getting started with Redux tutorial. It is simple single page application built on top of React + Redux JavaSript frameworks. It provides us decent functionality we can cover by Selenium test examples.

Functionality for testing

Let’s take a look at functionality of this simple example.
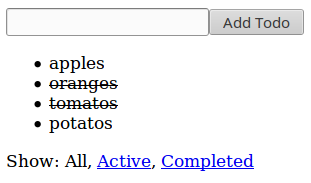
Page Object: todos-all

In text Input field, we can enter name of Todo item. Button Add Todo saves item into Todos list. When we click on any Todo item we can mark it as complete or incomplete.
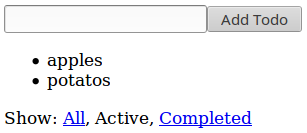
Page Object: todos-active

With Show buttons below the Todos list, we can filter items to show only Active

Page Object: todos-complete

…or Completed Todo items.

In fact this Todos example application doesn’t communicate with Spring Boot server. Front-end assets are just served from Spring Boot application. But we don’t need such communication to demonstrate Page Object example. I used Spring Boot, because it’s trivial to integrate Selenium tests with it. Note that goal of this blog post isn’t to explain Selenium or its APIs. It is expected for reader to be slightly familiar with them already.

Page Object class

As we mentioned, our end-to-end test will use Page object pattern. Goal of this pattern is to separate HTML details of testing page from actions that can be performed against the page. Listing that shows Page Object class for Todos application will be split into few parts, so that we can explain each part separately:

package net.lkrnac.blog.pageobject.e2e;

import org.openqa.selenium.By;
import org.openqa.selenium.WebDriver;
import org.openqa.selenium.WebElement;
import org.openqa.selenium.support.ui.ExpectedConditions;
import org.openqa.selenium.support.ui.WebDriverWait;

import java.util.List;

import static java.lang.String.format;
import static org.junit.Assert.*;


public class TodoPageObject {
    private WebDriver driver;
    private WebDriverWait wait;

    public TodoPageObject(WebDriver driver) {
        this.driver = driver;
        this.wait = new WebDriverWait(driver, 10);
    }

    public TodoPageObject get() {
        driver.get("localhost:8080");
        wait.until(ExpectedConditions.elementToBeClickable(By.tagName("button")));
        return this;
    }

Page Object class has two fields. First is Selenium WebDriver instance, which represents browser’s window wrapper used for controlling web page similar to real user. WebDriverWait is helper for waiting until HTML elements are rendered. Method get is used to load Todos page based on it’s URL.

    private WebElement findElementWithText(String text) {
        return driver.findElement(getConditionForText(text));
    }

    private List<WebElement> findElementsWithText(String text) {
        return driver.findElements(getConditionForText(text));
    }

    private By getConditionForText(String text) {
        return By.xpath(format("//*[text()='%s']", text));
    }

These three methods are private helpers for Todos actions shown later. We will used them to find HTML element or list of HTML elements based on the text they contain. For text search we use Selenium’s XPath APIs.

    public TodoPageObject addTodo(String todo) {
        WebElement input = driver.findElement(By.tagName("input"));
        input.sendKeys(todo);
        WebElement button = driver.findElement(By.tagName("button"));
        button.click();
        return this;
    }

    public TodoPageObject clickOnTodoItem(String todoItem) {
        findElementWithText(todoItem).click();
        return this;
    }

I believe names addTodo and clickOnTodoItem are self explanatory. We will use them to enter test into Todos input list, click Add Todo button and to mark Todo items complete/incomplete. Notice that return value is Todos Page Object instance, so that we can use fluent API during testing. This mechanism will keep our tests less verbose.

    public TodoPageObject selectAll() {
        findElementWithText("All").click();
        return this;
    }

    public TodoPageObject selectActive() {
        findElementWithText("Active").click();
        return this;
    }

    public TodoPageObject selectCompleted() {
        findElementWithText("Completed").click();
        return this;
    }

These three methods are using for clicking on filter buttons All/Active/Complete.

    public TodoPageObject verifyTodoShown(String todoItem, boolean expectedStrikethrough) {
        WebElement todoElement = findElementWithText(todoItem);
        assertNotNull(todoElement);
        boolean actualStrikethrough = todoElement.getAttribute("style").contains("text-decoration: line-through;");
        assertEquals(expectedStrikethrough, actualStrikethrough);
        return this;
    }

    public TodoPageObject verifyTodoNotShown(String todoItem) {
        assertTrue(findElementsWithText(todoItem).isEmpty());
        return this;
    }
}

Last two methods are used to verify if given Todo item is shown on not shown. When it’s shown we can verify if it’s completed via parameter expectedStrikethrough.

Tests

With such page object support we can start testing:

package net.lkrnac.blog.pageobject.e2e;

import io.github.bonigarcia.wdm.ChromeDriverManager;
import net.lkrnac.blog.pageobject.TodoApplication;
import org.junit.AfterClass;
import org.junit.BeforeClass;
import org.junit.Test;
import org.junit.runner.RunWith;
import org.openqa.selenium.WebDriver;
import org.openqa.selenium.chrome.ChromeDriver;
import org.springframework.boot.test.SpringApplicationConfiguration;
import org.springframework.boot.test.WebIntegrationTest;
import org.springframework.test.context.junit4.SpringJUnit4ClassRunner;

@RunWith(SpringJUnit4ClassRunner.class)
@SpringApplicationConfiguration(classes = TodoApplication.class)
@WebIntegrationTest
public class TodoAppTest {
    private static WebDriver driver;

    @BeforeClass
    public static void setUp() {
        ChromeDriverManager.getInstance().setup();
        driver = new ChromeDriver();
    }

    @AfterClass
    public static void tearDown() {
        driver.quit();
    }

    @Test
    public void testCreateTodos() {
        // GIVEN
        new TodoPageObject(driver).get()

            // WHEN
            .addTodo("testTodo1")
            .addTodo("testTodo2")

            // THEN
            .verifyTodoShown("testTodo1", false)
            .verifyTodoShown("testTodo2", false);
    }

    @Test
    public void testCompleteTodo() {
        // GIVEN
        new TodoPageObject(driver).get()
            .addTodo("testTodo1")
            .addTodo("testTodo2")

            // WHEN
            .clickOnTodoItem("testTodo1")

            // THEN
            .verifyTodoShown("testTodo1", true)
            .verifyTodoShown("testTodo2", false);
    }

    @Test
    public void testSelectActive() {
        // GIVEN
        new TodoPageObject(driver).get()
            .addTodo("testTodo1")
            .addTodo("testTodo2")
            .clickOnTodoItem("testTodo1")

            // WHEN
            .selectActive()

            // THEN
            .verifyTodoNotShown("testTodo1")
            .verifyTodoShown("testTodo2", false);
    }

    @Test
    public void testSelectCompleted() {
        // GIVEN
        new TodoPageObject(driver).get()
            .addTodo("testTodo1")
            .addTodo("testTodo2")
            .clickOnTodoItem("testTodo1")

            // WHEN
            .selectCompleted()

            // THEN
            .verifyTodoShown("testTodo1", true)
            .verifyTodoNotShown("testTodo2");
    }

    @Test
    public void testSelectAll() {
        // GIVEN
        new TodoPageObject(driver).get()
            .addTodo("testTodo1")
            .addTodo("testTodo2")
            .clickOnTodoItem("testTodo1")
            .selectCompleted()

            // WHEN
            .selectAll()

            // THEN
            .verifyTodoShown("testTodo1", true)
            .verifyTodoShown("testTodo2", false);
    }
}

These test cases cover some basic scenarios real user could perform against our Todos application. I am not going to explain them, because they are nicely readable due to usage of Page Object pattern. Separate huge benefit of this pattern I want to point out is decoupling tests from HTML. If we would change HTML structure on Todos page, we would need to change only Page Object class. Test cases would remain untouched.

Example code with all project files is hosted on Github.

Selenium tests on Gradle in Travis

Run Selenium tests on TravisCI

Stack of application I am currently working on at Dotsub is based on Java/Spring Boot back-end and React/Redux front-end. To have confidence that this application works end to end, we are using Selenium tests. It is very easy to run them as part application build, because Spring Boot testing support allows to run full application as part of application build. We use Gradle as main build system and it is all running on Travis continuous integration server. To demonstrate this approach for end to end testing I created small Hello World project on GitHub.

Build

Build system of choice is Gradle. Creation of following Gradle script was very easy, because I used Spring Initializr:

buildscript {
	ext {
		springBootVersion = '1.3.2.RELEASE'
	}
	repositories {
		mavenCentral()
	}
	dependencies {
		classpath("org.springframework.boot:spring-boot-gradle-plugin:${springBootVersion}")
	}
}

apply plugin: 'java'
apply plugin: 'idea'
apply plugin: 'spring-boot'

jar {
	baseName = 'blog-2016-01-selenium-on-travis'
	version = '0.0.1-SNAPSHOT'
}

sourceCompatibility = 1.8
targetCompatibility = 1.8

repositories {
	mavenCentral()
}


dependencies {
	compile('org.springframework.boot:spring-boot-starter')
	compile('org.springframework.boot:spring-boot-starter-web')
	testCompile('org.springframework.boot:spring-boot-starter-test')
    testCompile("org.seleniumhq.selenium:selenium-firefox-driver:2.49.0")
    testCompile('org.seleniumhq.selenium:selenium-support:2.49.0')
}

task wrapper(type: Wrapper) {
	gradleVersion = '2.9'
}

The only additional dependencies against generated script (by Spring Initializr) are Selenium, Firefox Selenium driver and Spring Starter Web. Adding spring-boot-starter-web into build will transform our project into web application with embedded Tomcat servlet container.

Hello World Application

To demonstrate Selenium Tests automation, I created very simple application code. First of all we need Spring Boot main class:

package net.lkrnac.blog.seleniumontravis;

import org.springframework.boot.SpringApplication;
import org.springframework.boot.autoconfigure.SpringBootApplication;

@SpringBootApplication
public class Application {
    public static void main(String... args){
        SpringApplication.run(Application.class);
    }
}

It is very standard Spring Boot construct for Spring context initialization.  Annotation @SpringBootApplication turns on Spring Boot auto-configuration. It sets up most sensible defaults for out application, which is most importantly embedded servlet container in this case.

Second part of our simple application code is front-end code. For demonstration purposes this simplest React example (taken from React getting started guide) will be enough:

<!DOCTYPE html>
<html>

<head>
    <meta charset="UTF-8" />
    <title>Hello React!</title>
    <script src="https://cdnjs.cloudflare.com/ajax/libs/react/0.14.7/react.min.js"></script>
    <script src="https://cdnjs.cloudflare.com/ajax/libs/react/0.14.7/react-dom.min.js"></script>
    <script src="https://cdnjs.cloudflare.com/ajax/libs/babel-core/5.8.23/browser.min.js"></script>
</head>

<body>
<div id="hello" />

<script type="text/babel">
    ReactDOM.render(
    <h1>Hello, world!</h1>, document.getElementById('hello') );
</script>
</body>

</html>

It uses Babel to transpile JSX inline and pulls React libraries from CDN. It doesn’t do any AJAX calls to server. We also didn’t create any Spring controller for serving requests. It is because goal of this example is to demonstrate Selenium testing against React+Spring Boot app, therefore I skipped communication between client and server.

This simple HTML + React Hello World page is located in file src/main/resources/static/index.html, where it will be picked up by Spring Boot and exposed as default web page content when request hits root URL of embedded servlet container.

Simple Selenium Test

Following listing shows how can we approach selenium testing against Spring Boot application:

import net.lkrnac.blog.seleniumontravis.Application;
import org.junit.AfterClass;
import org.junit.BeforeClass;
import org.junit.Test;
import org.junit.runner.RunWith;
import org.openqa.selenium.By;
import org.openqa.selenium.firefox.FirefoxDriver;
import org.openqa.selenium.support.ui.ExpectedConditions;
import org.openqa.selenium.support.ui.WebDriverWait;
import org.springframework.boot.test.SpringApplicationConfiguration;
import org.springframework.boot.test.WebIntegrationTest;
import org.springframework.test.context.junit4.SpringJUnit4ClassRunner;

import java.io.IOException;

@RunWith(SpringJUnit4ClassRunner.class)
@SpringApplicationConfiguration(Application.class)
@WebIntegrationTest
public class ApplicationTest {
    private static FirefoxDriver driver;

    @BeforeClass
    public static void setUp() throws IOException {
        driver = new FirefoxDriver();
    }

    @Test
    public void contextLoads() {
        driver.get("https://localhost:8080");
        WebDriverWait wait = new WebDriverWait(driver, 10);
        wait.until(ExpectedConditions.textToBePresentInElementLocated(
                By.id("hello"), "Hello, world!"));
    }

    @AfterClass
    public static void tearDown() {
        driver.quit();
    }
}

Before test, it starts Firefox Selenium driver. During test it visits default specified address https://localhost:8080. This should hit our index.html. Next phase of the test is waiting for Hello, world! header to be rendered on screen. After this happens, test is done and Selenium driver is closed. When we run this test locally, we can see following pop-up appear on the screen.

Selenoum Tests

Travis Configuration

Last piece of this example it TravisCI configuration manifest. Relevant parts of it are here:

language: java
jdk:
  - oraclejdk8

before_script:
  - "export DISPLAY=:99.0"
  - "sh -e /etc/init.d/xvfb start"
  - sleep 3 # give xvfb some time to start

script: ./gradlew build --continue

First of all we specify that Java 8 is our language of choice. Before script part is taken from TravisCI docs. It starts Xvfb (X virtual frame buffer), which simulates X11 display server on Linux machine without screen. This allows render our site virtually, because TravisCI build machine contains installation of Firefox by default. This configuration is enough for Selenium tests. In script phase we start full Gradle build.

Possible Travis problems and solution

All this configuration may be enough for you to start simple Selenium testing again React application. But default Firefox version on TravisCI machine is 31.0 ESR. This is quite old version and some of our React pages may not be rendered correctly during the build. Luckily TravisCI allows to update Firefox version with this simple manifest declaration:

addons:
  firefox: "44.0"

This installs new version of Firefox on TravisCI, but unfortunately it is not enough because of this open TravisCI issue. Consequence is that default configuration of Selenium Firefox driver configuration use old Firefox binary instead of new one.

But when I executed which firefox command on Travis, it was pointing to new binary file. Therefore I used this Selenium Driver initialization to pick up newer Firefox binary on Travis:

import net.lkrnac.blog.seleniumontravis.Application;
import org.junit.AfterClass;
import org.junit.BeforeClass;
import org.junit.Test;
import org.junit.runner.RunWith;
import org.openqa.selenium.By;
import org.openqa.selenium.firefox.FirefoxBinary;
import org.openqa.selenium.firefox.FirefoxDriver;
import org.openqa.selenium.firefox.FirefoxProfile;
import org.openqa.selenium.support.ui.ExpectedConditions;
import org.openqa.selenium.support.ui.WebDriverWait;
import org.slf4j.Logger;
import org.slf4j.LoggerFactory;
import org.springframework.boot.test.SpringApplicationConfiguration;
import org.springframework.boot.test.WebIntegrationTest;
import org.springframework.test.context.junit4.SpringJUnit4ClassRunner;

import java.io.BufferedReader;
import java.io.File;
import java.io.IOException;
import java.io.InputStreamReader;

@RunWith(SpringJUnit4ClassRunner.class)
@SpringApplicationConfiguration(Application.class)
@WebIntegrationTest
public class UseNewFirefoxOnTravisTest {
    private static FirefoxDriver driver;

    @BeforeClass
    public static void setUp() throws IOException {
        String travisCiFlag = System.getenv().get("TRAVIS");
        FirefoxBinary firefoxBinary = "true".equals(travisCiFlag)
                ? getFirefoxBinaryForTravisCi()
                : new FirefoxBinary();

        driver = new FirefoxDriver(firefoxBinary, new FirefoxProfile());
    }

    private static FirefoxBinary getFirefoxBinaryForTravisCi() throws IOException {
        String firefoxPath = getFirefoxPath();
        Logger staticLog = LoggerFactory.getLogger(UseNewFirefoxOnTravisTest.class);
        staticLog.info("Firefox path: " + firefoxPath);

        return new FirefoxBinary(new File(firefoxPath));
    }

    private static String getFirefoxPath() throws IOException {
        ProcessBuilder pb = new ProcessBuilder("which", "firefox");
        pb.redirectErrorStream(true);
        Process process = pb.start();
        try (InputStreamReader isr = new InputStreamReader(process.getInputStream(), "UTF-8");
             BufferedReader br = new BufferedReader(isr)) {
            return br.readLine();
        }
    }

    @Test
    public void contextLoads() {
        driver.get("https://localhost:8080");
        WebDriverWait wait = new WebDriverWait(driver, 10);
        wait.until(ExpectedConditions.textToBePresentInElementLocated(
                By.id("hello"),
                "Hello, world!")
        );
    }

    @AfterClass
    public static void tearDown() {
        driver.quit();
    }
}

Testing logic is the same as for example test we already introduced. Different is initialization of Firefox Selenium driver. In this case we first recognize if we are running in Travis environment via environment variable TRAVIS. If we are not running in Travis, we use default Firefox driver initialization.

If we are running in TravisCI build, we use standard Java class ProcessBuilder to execute Linux command which firefox in separate process and grab it’s output. This gives us path of newer Firefox binary. Based on this path, we initialize Firefox Selenium driver and are good to automatically run Selenium test against latest Firefox on TravisCI build machine.

Source code for this example is located in GitHub.

enterprise spring examples and integration tests

Enterprise Spring examples and integration tests

There was longer gap in my blog, because I was busy writing book Pivotal Certified Spring Enterprise Integration Specialist Exam – A Study Guide. This book is example heavy. Fortunately Apress agreed to open source all these examples. Therefore there is quite extensive collection of Spring examples available in this GitHub repository. Altogether  146 Spring examples with integration tests.

Most of the examples use Spring Boot. But as book is not focused on this modern framework, therefore there are included also plain Spring Framework examples. So is is possible can compare how Spring Boot can simplify Spring developer’s life. Most of the examples are covered with Java and also with XML configuration (where it make sense), therefore it provides also good comparison between these two approaches.

Examples cover main Enterprise Spring features of:

  • Spring Tasks and Scheduling
  • Spring Remoting (RMI, HttpInvoker, Hessian, Burlap)
  • Spring Web Services (SOAP)
  • REST Services with Spring (Spring MVC and JAX-RS)
  • Spring JMS
  • Spring JMS transactions and acknowledge modes
  • Distributed Transactions with Spring
  • Spring Integration
  • Spring Batch

As I am test infected, I wanted to make sure that examples are working. Therefore extensive test suite was created, where each example is backed up by integration test. These tests can be useful as ideas for integration testing of Spring applications.

Few examples are used to highlight error handling features of Spring, therefore there are sometimes errors simulated in example logic. Book would be needed to fully understand intentions of these examples. Some examples cover advanced Spring topics (e.g. Distributed Transactions, Spring Batch Remote Chunking or Spring Batch Remote Partitioning). Examples for these topics are not very common on web, so these simplistic examples can help grasp advanced these Spring features.

Hope somebody will find this battery of examples and tests valuable and possibly give a chance to this book.

Black Box Testing of Spring Boot Microservice is so easy

When I needed to do prototyping, proof of concept or play with some new technology in free time, starting new project was always a little annoying barrier with Maven. Have to say that setting up Maven project is not hard and you can use Maven Archetypes. But Archetypes are often out of date. Who wants to play with old technologies? So I always end up wiring in dependencies I wanted to play with. Not very productive spent time.

But than Spring Boot came to my way. I fell in love. In last few months I created at least 50 small playground projects, prototypes with Spring Boot. Also incorporated it at work. It’s just perfect for prototyping, learning, microservices, web, batch, enterprise, message flow or command line applications. You have to be dinosaur or be blind not to evaluate Spring Boot for your next Spring project. And when you finish evaluate it, you will go for it. I promise.

I feel a need to highlight how easy is Black Box Testing of Spring Boot microservice. Black Box Testing refers to testing without any poking with application artifact. Such testing can be called also integration testing. You can also perform performance or stress testing way I am going to demonstrate.

Spring Boot Microservice is usually web application with embedded Tomcat. So it is executed as JAR from command line. There is possibility to convert Spring Boot project into WAR artifact, that can be hosted on shared Servlet container. But we don’t want that now. It’s better when microservice has its own little embedded container.

I used existing Spring’s REST service guide as testing target. Focus is mostly on testing project, so it is handy to use this “Hello World” REST application as example. I expect these two common tools are set up and installed on your machine:

So we’ll need to download source code and install JAR artifact into our local repository. I am going to use command line to download and install the microservice. Let’s go to some directory where we download source code. Use these commands:

git clone git@github.com:spring-guides/gs-rest-service.git
cd gs-rest-service/complete
mvn clean install

If everything went OK, Spring Boot microservice JAR artifact is now installed in our local Maven repository. In serious Java development, it would be rather installed into shared repository (e.g. Artifactory, Nexus,… ). When our microservice is installed, we can focus on testing project. It is also Maven and Spring Boot based.

Black box testing will be achieved by downloading the artifact from Maven repository (doesn’t matter if it is local or remote). Maven-dependency-plugin can help us this way:

<plugin>
    <groupId>org.apache.maven.plugins</groupId>
    <artifactId>maven-dependency-plugin</artifactId>
    <executions>
        <execution>
            <id>copy-dependencies</id>
            <phase>compile</phase>
            <goals>
                <goal>copy-dependencies</goal>
            </goals>
            <configuration>
                <includeArtifactIds>gs-rest-service</includeArtifactIds>
                <stripVersion>true</stripVersion>
            </configuration>
        </execution>
    </executions>
</plugin>

It downloads microservice artifact into target/dependency directory by default. As you can see, it’s hooked to compile phase of Maven lifecycle, so that downloaded artifact is available during test phase. Artifact version is stripped from version information. We use latest version. It makes usage of JAR artifact easier during testing.

Readers skilled with Maven may notice missing plugin version. Spring Boot driven project is inherited from parent Maven project called spring-boot-starter-parent. It contains versions of main Maven plugins. This is one of the Spring Boot’s opinionated aspects. I like it, because it provides stable dependencies matrix. You can change the version if you need.

When we have artifact in our file system, we can start testing. We need to be able to execute JAR file from command line. I used standard Java ProcessBuilder this way:

public class ProcessExecutor {
	public Process execute(String jarName) throws IOException {
		Process p = null;
		ProcessBuilder pb = new ProcessBuilder("java", "-jar", jarName);
		pb.directory(new File("target/dependency"));
		File log = new File("log");
		pb.redirectErrorStream(true);
		pb.redirectOutput(Redirect.appendTo(log));
		p = pb.start();
		return p;
	}
}

This class executes given process JAR based on given file name. Location is hard-coded to  target/dependency directory, where maven-dependency-plugin located our artifact. Standard and error outputs are redirected to file. Next class needed for testing is DTO (Data  transfer object). It is simple POJO that will be used for deserialization from JSON. I use Lombok project to reduce boilerplate code needed for getters, setters, hashCode and equals.

@Data
@AllArgsConstructor
@NoArgsConstructor
public class Greeting {
    private long id;
    private String content;
}

Test itself looks like this:

public class BlackBoxTest {
	private static final String RESOURCE_URL = "https://localhost:8080/greeting";

	@Test
	public void contextLoads() throws InterruptedException, IOException {
		Process process = null;
		Greeting actualGreeting = null;
		try {
			process = new ProcessExecutor().execute("gs-rest-service.jar");

			RestTemplate restTemplate = new RestTemplate();
			waitForStart(restTemplate);

			actualGreeting = restTemplate.getForObject(RESOURCE_URL, Greeting.class);
		} finally {
			process.destroyForcibly();
		}
		Assert.assertEquals(new Greeting(2L, "Hello, World!"), actualGreeting);
	}

	private void waitForStart(RestTemplate restTemplate) {
		while (true) {
			try {
				Thread.sleep(500);
				restTemplate.getForObject(RESOURCE_URL, String.class);
				return;
			} catch (Throwable throwable) {
				// ignoring errors
			}
		}
	}
}

It executes Spring Boot microservice process first and wait unit it starts. To verify if microservice is started, it sends HTTP request to URL where it’s expected. The service is ready for testing after first successful response. Microservice should send simple greeting JSON response for HTTP GET request. Deserialization from JSON into our Greeting DTO is verified at the end of the test.

Source code is shared on Github.