All posts by Lubos Krnac

Load inheritance tree into List with Spring

I noticed interesting Spring feature. One of my colleagues used it for loading whole inheritance tree of Spring beans into list. Missed that when I was studying Spring docs.

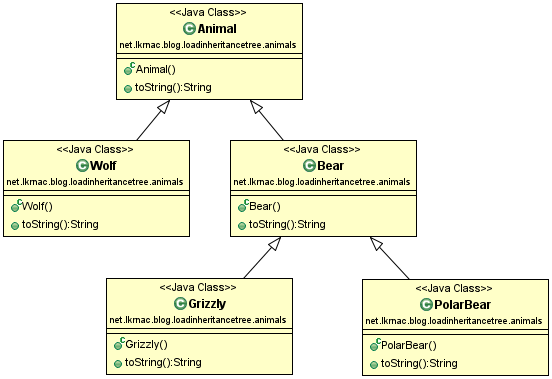
Let’s have this inheritance tree of Spring beans:

animals-class-diagram

Not let’s load inheritance tree of beans into list with constructor injection:

@Component
public class Nature {
	List<Animal> animals;

	@Autowired
	public Nature(List<Animal> animals) {
		this.animals = animals;
	}

	public void showAnimals() {
		animals.forEach(animal -> System.out.println(animal));
	}
}

Method showAnimals is using Java 8 lambda expression to output loaded beans into console. You would find a lot of reading about this new Java 8 feature these days.

Spring context is loaded by this main class:

public class Main {
	public static void main(String[] args) {
		AnnotationConfigApplicationContext context =
				new AnnotationConfigApplicationContext(SpringContext.class);

		Nature nature = context.getBean(Nature.class);
		nature.showAnimals();
	}
}

Console output:

PolarBear []
Wolf []
Animal []
Grizzly []
Bear []

This feature can be handy sometimes. Source code of this short example is on Github.

Eclipse Kepler + Java 8: Syntax error, annotations are only available if source level is 1.5 or greater

When I configured project with Spring, Maven and Java 8, my Eclipse showed a lot of errors. I noticed mostly refusing to accept annotations:

Syntax error, annotations are only available if source level is 1.5 or greater.

Eclipse Kepler doesn’t have built in support for JDK8. So there is needed to install JDT with Java8 support.

I use Spring Tools Suite 3.5.0.RELEASE, which  is still based on Eclipse Kepler (4.3.2). That is why STS needs this update.

Measuring code coverage by Protractor end-to-end tests

Was just setting up new JavaScript project based on Grunt. I scaffolded the project template by Yeoman with usage of angular-fullstack generator. I decided to try MEAN stack without MongoDB for my new project (DB isn’t needed).

Next step was integrating Require.JS and configuring measurement of code coverage on client and server by Instanbul. When was this all done I was wondering if it is possible to measure code coverage by Protractor end-to-end testing.

After quick search I found that Ryan Bridges recently released grunt-protractor-coverage plugin. Interesting coincidence. So I decided to try it and can confirm that it’s working fine with mentioned stack. Configuration was smooth and Ryan fixed small issue very promptly. It’s based on grunt-protractor-runner plugin.

I created separate Grunt configuration file just for this purpose not to mess around with normal build. I had also problems to run ‘makeReport’ task of grunt-istanbul plugin for two different directories (Mocha server side code coverage measurement is using same task).

So here is the Grunt flow. First we need to copy non JavaScript files into target directory. It needs to be in separate directory because JavaScript files will need to be instrumented.

copy: {
  coverageE2E: {
    files: [{
      expand: true,
      dot: true,
      cwd: '<%= dirs.app %>',
      dest: '<%= dirs.instrumentedE2E %>/app',
      src: [
        '*.{ico,png,txt}',
        '.htaccess',
        'bower_components/**/*',
        'images/**/*',
        'fonts/**/*',
        'views/**/*',
        'styles/**/*',
      ]
    }]
  },
},

Next step is instrumentation of the code. It is needed for gathering coverage stats. Each line is decorated by special instructions that helps during measurement. Pay attention to fact that we are instrumenting server and client side code. Instrumented code is placed into target directory represented by placeholder <%= dirs.instrumentedE2E %>.

instrument: {
  files: ['server/**/*.js', 'app/scripts/**/*.js'],
  options: {
    lazy: true,
    basePath: '<%= dirs.instrumentedE2E %>/'
  }
},

Next we start Express from target directory.

express: {
  options: {
    port: process.env.PORT || 9000
  },
  coverageE2E: {
    options: {
      script: '<%= dirs.instrumentedE2E %>/lib/server.js',
      debug: true
    }
  },
},

And the protractor_coverage task of grunt-protractor-coverage plugin. Configuration should be the same as for grunt-protractor-runner plugin.

protractor_coverage: {
  options: {
    configFile: 'test/protractor/protractorConf.js', // Default config file
    keepAlive: true, // If false, the grunt process stops when the test fails.
    noColor: false, // If true, protractor will not use colors in its output.
    coverageDir: '<%= dirs.instrumentedE2E %>',
    args: {}
  },
  chrome: {
    options: {
      args: {
        baseUrl: 'https://localhost:3000/',
        // Arguments passed to the command
        'browser': 'chrome'
      }
    }
  },
},

Last step is generation  of coverage report.

makeReport: {
  src: '<%= dirs.instrumentedE2E %>/*.json',
  options: {
    type: 'html',
    dir: '<%= dirs.coverageE2E %>/reports',
    print: 'detail'
  }
},

Finally, this is grunt task gathering all steps.

grunt.registerTask('default', [
  'clean:coverageE2E',
  'copy:coverageE2E',
  'instrument',
  'express:coverageE2E',
  'protractor_coverage:chrome',
  'makeReport'
]);

EDIT: Notice that following Github link was changed to branch, because project structure was significantly changed:

Source code for this project can be found on GitHub.

For running end to end Protractor test you have to have webdriver-manager running. See  Protractor documentation.

To install and start Selenium Webdriver:

npm install -g protractor
webdriver-manager update
webdriver-manager start

To install project dependencies:

npm install
bower install

To run this end-to-end testing with coverage measurement (webdriver-manager has to be running):

grunt --gruntfile Gruntfile-e2e.js
Trigger Continuous Delivery every GitHub commit

Crucial piece of puzzle when developing web application is Continuous Delivery. Testers or users can by early access to alpha version contribute to development process. Design,  requirements, architecture or performance problems can be catched much sooner.

I am going to show how to set up this process with usage of Maven and Jenkins. Target environment is hosted on Tomcat7. Source code is hosted on GitHub. Because I am type of developer that tries to avoid polling as much as possible, I am going to show how to trigger this process by GitHub’s cool feature called WebHooks.

1. Create Continuous Delivery job

Creation of Jenkins job and integrating it with Maven is very easy. Will quickly cover this:

  • Create it with “New Item” -> “
  • Set up GitHub URL in section “Source Code Management” (Authentication is not needed in my case, because my GitHub repository is public)
  • Skip section “Build Triggers” for now, will come back to this later.
  • Configure “Build” section with POM path and goals you are using for building your WAR file
  • Set up “Build Settings” -> “E-Mail Notification”

Save and try to run the Jenkins job. This is very common and basic Jenkins job configuration. Now we are about to set up deployment of WAR file into Tomcat7. But here comes dilemma into play. There are two very mature ways for deployment. I will cover both and let reader pick one.

a) Continuous Delivery with usage of tomcat7-maven-plugin

  • First of all we need to enable access into Tomcat7. Edit $CATALINA_HOME/conf/tomcat-users.xml (CATALINA_HOME is Tomcat’s home directory) and configure role and user as follows
<role rolename="manager-script"/>
<user username="deployer" password="===PASSWORD===" roles="manager-script"/>
  • Configure Tomcat7 credentials for Maven in configuration file settings.xml. This file is usually located in <user_home>/.m2.
<server>
	<id>tomcat-server-alpha</id>
	<username>deployer</username>
	<password>===PASSWORD===</password>
</server>
  • Set up tomcat7-maven-plugin into pom.xml
<plugin>
	<groupId>org.apache.tomcat.maven</groupId>
	<artifactId>tomcat7-maven-plugin</artifactId>
	<version>2.2</version>
	<configuration>
		<url>https://[JENKINS-URL]/manager/text</url>
		<server>tomcat-server-alpha</server>
		<path>/[TOMCAT-DEPLOY-PATH]</path>
	</configuration>
</plugin>
  • Lastly add additional Maven goal “tomcat7:redeploy” into Jenkins job

b) Continuous Delivery with usage of Jenkins Deploy plugin

  • Install Jenkins Deploy plugin
  • In Jenkins job that builds WAR, configure “Add post-build action” -> “Deploy ear/war to container”
jenkins-tomcat-deploy

2. Jenkins – GitHub integration

  • Blocking requirement here is to have Jenkins server accessible from web. If you can’t for whatever reason, you must stick with polling the source control in Jenkins.
  • Install GitHub plugin into Jenkins
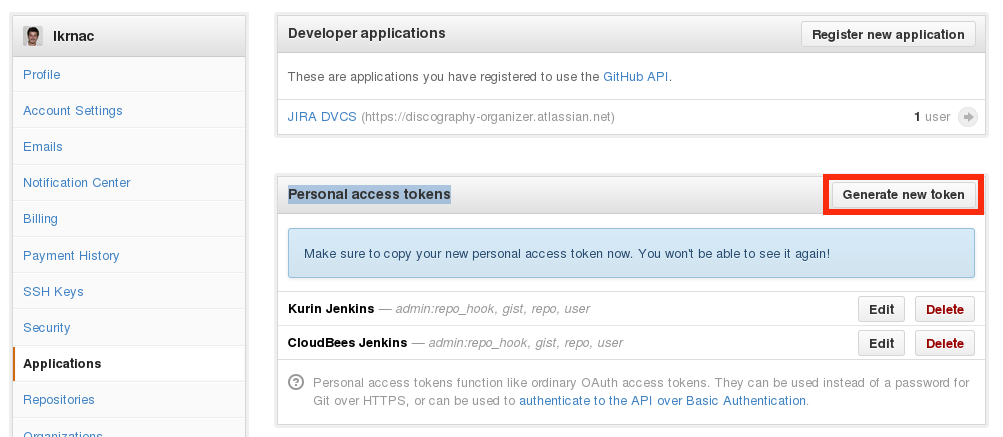
  • Generate Personal access token in GitHub for Jenkins. This can be found under “Edit Your Profile” -> “Applications”
github-generate-new-token
  • Set up GitHub plugin to use generated token in Jenkins. You can find this section in “Manage Jenkins” -> “Configure System” -> “GitHub Web Hook”. Note that you don’t need to use password. API URL is “https://api.github.com”
jenkins-github-web-hook
  • Create WebHook in Github. Open repository -> “Settings” -> “Webhooks & Services” -> “Create Webhook”
  • Use Jenkins URL with suffix “/github-webhook”. Jenkins will replace automatically as you configure jobs, so that it’s not needed to create GitHub hook for each Jenkins job
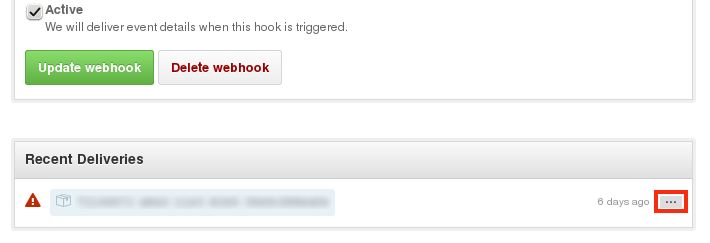
  • After creation you can test webhook via three dots in “Recent Deliveries”. HTML error code “302 Found” means that it’s working fine (even when GitHub highlights it with exclamation mark).
github-webhook-creation
  • Finally enable GitHub triggering in Jenkins job
jenkins-job-triggers

That’s it. Github commit should cause deploy into Tomcat now.

References

  1. Jenkins GitHub plugin documentation
  2. Tomcat Maven plugin documentation

Promoting constructor over field injection

I wrote blog post about testing field injection with Mockito (using @InjectMocks/@Mock/@Spy). It describes how to inject dependencies into testing object. But I didn’t pay attention to thinking about problems of field injection itself. Let me summarize few arguments against field injections that convinced me to treat it as bad practice:

  1. Field injection hides class dependencies. Constructor injection on the other hand exposes them. So it’s enough to look at class API.
  2. Constructor injection doesn’t allow creation of circular dependencies.
  3. Constructor injection uses standard Java features to inject dependencies. It is definitely much cleaner than field injection which involves using reflection twice under the hood:
    1. Spring must use reflection to inject private field
    2. Mockito (during the test) must use reflection to inject mocks into testing object
  4. Developer would need to create awful non-default constructor with a lot of parameters for tightly coupled class. Nobody likes huge amount of parameters. So constructor injection naturally forces him to think about decoupling and reducing dependencies for the class. This is biggest advantage of constructor injection for me.

So I am another member of Constructor injection camp now. This nice Petri Kainulainen’s blog post gathers more reading about pros and cons of both approaches.