This subject interested me for a long time. When I google “package by layer” vs “package by feature” or “folder by type” vs “folder by feature”, there seem to be growing camp of proponents of “by feature” structure. I am in this camp too.
But not only application developers are proponents of it. Angular (one of the most prominent Single Page Application frameworks) is promoting such folder structure in their style guide.
Spring Project Structure
As there is plenty of reading about pros and cons of each approach out there, I will focus on implications for Spring project.
Traditional structure of laying down Spring CRUD applications (if your back-end application is not using Spring Data REST) is divided into 3 layers: web/service/persistence. Vast majority of Java/Spring projects I was working on followed this structure.
Coupling
Package by layer most probably originates in previous century, where layered architectures were used as decoupling mechanism. In fact “decoupling” was often the answer when I was challenging package by layer structure. I disagree. To me package by layer is one of the major reasons causing tight coupling.
When you are writing signature for class in package by layer structured project, what keyword is the first? I bet it is public. Does public access modifier help decoupling? I guess nobody would answeryes to this question.
Why developers are using public access modifier all over the place? It is exactly because the project is structured in by layer fashion. Repository class needs to be public, because it needs to be accessed from service package and service needs to be public because it needs to be accessed from web package. When everything is public, it is very hard to maintain the discipline which doesn’t lead to big ball of mud.
When using package by feature, package private UserRepository (it means no access modifier is specified) can’t be used by other service than UserService, because they are in same package. And if we decide that only UserController should use UserService, we just make it package private, because they share same package. In such project structure most of the classes would be package private. Therefore developer should have very good reason to make class public.
Scaling
What happens if project starts to have 10+ classes in web/service/persistence layer? Developers tend to group classes into sub-packages. But how do they categorize them? From my experience, it is mostly based on features. So we can often find such structure in bigger projects:
.
└── net
    └── lkrnac
        └── blog
            ├── Application.java
            ├── dao
            │   ├── ...other repositories...
            │   ├── ProjectRepository.java
            │   └── user
            │       ├── UserRepository.java
            │       └── UserRoleRepository.java
            ├── dto
            │   ├── ...other DTOs...
            │   ├── ProjectDto.java
            │   └── user
            │       ├── UserDto.java
            │       └── UserRoleDto.java
            ├── model
            │   ├── ...other models...
            │   ├── Project.java
            │   └── user
            │       ├── User.java
            │       └── UserRole.java
            ├── service
            │   ├── ...other services...
            │   ├── ProjectService.java
            │   └── user
            │       ├── UserRoleService.java
            │       └── UserService.java
            └── web
                ├── ...other controllers...
                ├── ProjectController.java
                └── user
                    ├── UserController.java
                    └── UserRoleController.java
Imagine you would need to extract micro-service from your monolith project. Or split whole project into micro-services. I hope everybody understands that no sane micro-services architecture is separated by architectural layers. Separation based on features is used. So which project structure will be easier to separate into micro-services? The one, where any public class can use any other public class from any package (package by layer)? Or one, separated into package private buckets (package by feature)? I believe the answer is obvious.
Conslusion
Package by feature is simple but very powerful mechanism for decoupling. So next time some layer obsessed developer will be defending package by layer project structure as decoupling mechanism, please correct her/his misunderstanding. I believe dinosaur-ness is the only reason why package by layer still exists nowadays.
I am going to explain how to aggregate test coverage report for Gradle multi-module project. For measuring test coverage, we will use JaCoCo. Example project will use TravisCI build server and will submit coverage report to Coveralls.io.
Multi-Module project is project which creates various modules in single build, typically JARs in Java world. Such project structure is handy for splitting monolithic projects into decoupled pieces. But wait a second. Didn’t Microservices fever put monoliths into architecture anti-pattern position? No, it didn’t.
Problem
We are also building monolithic application at Dotsub. Build system of our choice is Gradle and build server is TravisCI. We use Coveralls.io to store our test coverage reports. When our code-base grew to the point when we needed to separate concerns into separate modules, I ran into problems around gathering test coverage. On Coveralls.io, you can submit only one coverage report per TravisCI build. As we wanted to have whole project built with single build, our only option was merging test coverage reports for each module and submit such aggregated report.
.
├── build.gradle
├── .coveralls.yml
├── gradlecoverage
│   ├── build.gradle
│   └── src
│       ├── main
│       │   └── java
│       │       └── net
│       │           └── lkrnac
│       │               └── blog
│       │                   └── gradlecoverage
│       │                       └── GradleCoverageApplication.java
│       └── test
│           └── java
│               └── net
│                   └── lkrnac
│                       └── blog
│                           └── gradlecoverage
│                               └── GradleCoverageApplicationTest.java
├── module1
│   ├── build.gradle
│   └── src
│       ├── main
│       │   └── java
│       │       └── net
│       │           └── lkrnac
│       │               └── blog
│       │                   └── gradlecoverage
│       │                       └── Module1Service.java
│       └── test
│           └── java
│               └── net
│                   └── lkrnac
│                       └── blog
│                           └── gradlecoverage
│                               └── Module1ServiceTest.java
├── module2
│   ├── build.gradle
│   └── src
│       ├── main
│       │   └── java
│       │       └── net
│       │           └── lkrnac
│       │               └── blog
│       │                   └── gradlecoverage
│       │                       └── Module2Service.java
│       └── test
│           └── java
│               └── net
│                   └── lkrnac
│                       └── blog
│                           └── gradlecoverage
│                               └── Module2ServiceTest.java
├── moduleCommon
│   ├── build.gradle
│   └── src
│       ├── main
│       │   └── java
│       │       └── net
│       │           └── lkrnac
│       │               └── blog
│       │                   └── gradlecoverage
│       │                       └── CommonService.java
│       └── test
│           └── java
│               └── net
│                   └── lkrnac
│                       └── blog
│                           └── gradlecoverage
│                               └── CommonServiceTest.java
├── settings.gradle
└── .travis.yml
There is main module gradlecoverage, which is dependent on module1 and module2. Last moduleCommon is shared dependency for module1 and module2. Each module contains simple string concatenation logic with test. The code is very basic, so we are not going to explain it here. You can inspect it on Github.
Each test intentionally doesn’t cover some test cases. This way we will prove that test coverage reports are accurate.
Module Build Script
Each module has very simple build script. Example of module1/gradle.properties follows:
The script just defines JAR module name and imports other module as dependency. Other scripts have very similar build scripts.
Main Build Script
First of all we need to import all sub-modules in settings.properties:
include 'moduleCommon'
include 'module1'
include 'module2'
include 'gradlecoverage'
In main script we will apply jacoco and coveralls plugins. JaCoCo plugin will be needed for aggregating coverage reports form sub-modules. We will create custom task for aggregation. Coveralls plugin will submit aggregated report to Coveralls.io.
plugins {
    id 'jacoco'
    id 'com.github.kt3k.coveralls' version '2.6.3'
}

repositories {
    mavenCentral()
}
Next we configure Java and import dependencies for sub-modules in subprojects section:
First we read all sub-modules into publishedProjects variable. After that we define custom aggregation jacocoRootReport task. It is inherited from JacocoReport task type. This task will be dependent on test task of each module from publishedProjects. This makes sure that test coverage reports for sub-modules are gathered for aggregation before jacocoRootReport is executed. Next we configure necessary directories for JaCoCo engine and gather all execution data from sub-modules.
Lastly we configure what kind of output we want to generate. Configuration xml.enabled = true will create aggregated report which will be submitted to Coveralls.io via coveralls task.
TravisCI Manifest
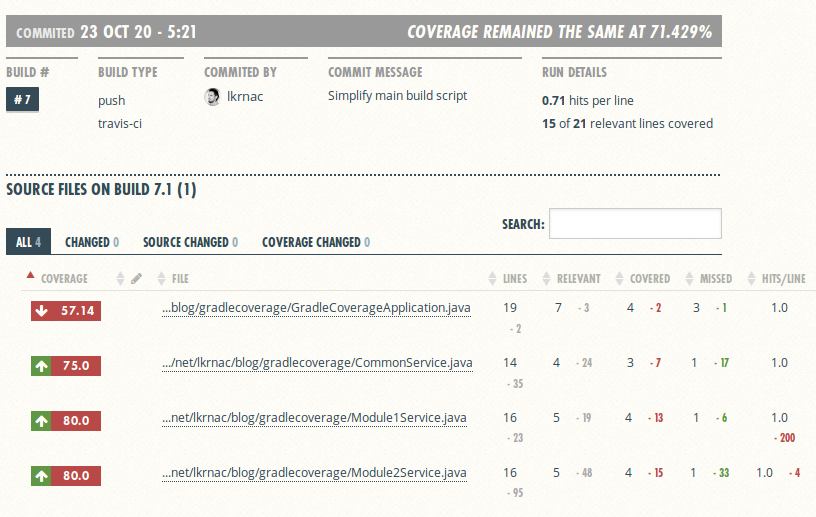
TravisCI Manifest (.travis.yml) file configure Java environment and runs single command to build and submit aggregated test coverage report by executing coveralls task:
As you can see, there are all classes from separate modules. The only problem is that we can’t fond which module class belong to from such coverage report. But it’s not a big deal to me.
Previously I showed how we at Dotsub use Page Object pattern for Selenium testing. But we use one more abstraction to make end-to-end test more maintainable. We call it Component Object pattern. This blog post will explain it on example.
Web development is shifting more and more towards reusable components. Frameworks like React, Polymer, Angular, Ember and others provide various component friendly abstractions to make front-end code-bases more maintainable. So our web applications are now full of “widgets” that have same behavior. We can use component various times on single web page or re-use it on various web pages.
Therefore it is logical to create abstraction which covers functionality of single component and reuse it across end-to-end tests. As I mentioned before, we going to call it Component Object pattern. So when we have various same components on single web page, we are going to use various Component Objects of same type per Page Object.
Example project for testing
Now we need to application we are going to test. Example application is hosted in this Github repository. You can run it by executing command from root directory:
./gradlew bootRun
From this command, you can find that it is Spring Boot application based on Gradle build system. In Dotsub, we are using Spring Boot + Java on back-end, but in fact there is no back-end mentioned example web application. We don’t need back-end for our demonstration.
For UI, we going to use React + Redux combo. I chose famous Dan Abramov’s Todos example to demonstrate Component Object pattern on. But I needed to amend it a little bit to reuse components. Without re-usable components we couldn’t demonstrate Component Object pattern.
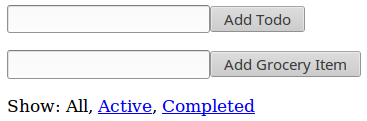
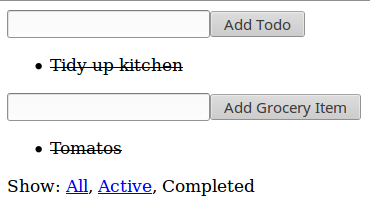
After visiting URL http://localhost:8080, we can see following page:
There are two input components with buttons. One creates item in Todo list and second creates item in Grocery list:
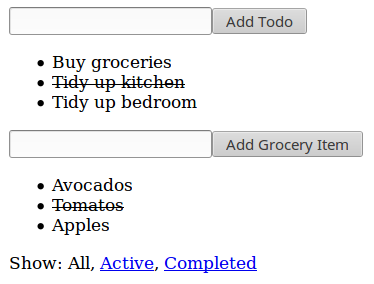
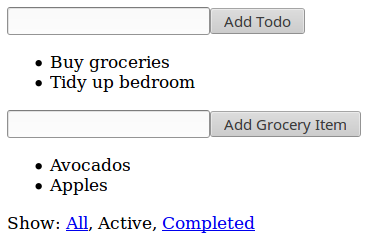
When you click on item, it will mark it as completed (strike-through). When you click on completed item, it will become active again. Last element on the page is filter. You can show only active items:
or only completed items:
UI code is hosted in this Github repository, located under folder src/main/ui. I will leave this code for self study because the implementation is not deeply relevant for end-to-end testing code. Important fact for us is that input components / list components for Todo and Grocery lists should have same behavior. Thus they can be covered by reusable Component Objects pattern. Interesting is that they doesn’t necessary need to be implemented as same component in UI code.
The only important for our testing are CSS classes of particular components:
AddTodo input component is using CSS class add-todo
TodoList is using CSS class todo-list
AddGroceryItem input component is using CSS class add-grocery-item
GroceryList is using CSS class grocery-list
Note that goal of this blog post isn’t to explain Selenium or its APIs. It is expected for reader to be slightly familiar with them already.
Component Object for adding the item
First explained component object will control adding the item:
Alongside Selenium web driver instance, this component object also accepts CSS selector of component it’s going to control. It has just one method addItem, which enters a text into input field and clicks Add button. It creates new item.
Similar to AddItemComponent, ItemsListComponent also takes Selenium web driver instance and CSS selector of belonging component as constructor parameters. It exposes function clickOnItem for which clicks on particular item. Other two non-private methods are used to verify if particular item is shown (verifyItemShown) or hidden (verifyItemNotShown).
Page Object using Component Objects
Now it’s time to explain Page Object using mentioned Component Objects:
In constructor it creates component objects with correct CSS selectors. As you can see various instances of same component object type are used to control similar components on the page. Method get opens the page and waits until it’s loaded. Methods selectAll, selectActive, selectCompleted are used to control filter component on the page. Methods addTodo and addGroceryItem are used to enter new item into particular list. Finally getters getTodoList and getGroceryList are useful to let test class enable control over list components. Exposing component object instances to directly seemed easier than wrapping all their functions in Page Object.
Test Cases using Page Object with Page Components
I believe final test cases are readable and doesn’t require comments (which is result of using Page Object + Page Component patterns):
package net.lkrnac.blog.pageobject.e2e;

import io.github.bonigarcia.wdm.ChromeDriverManager;
import net.lkrnac.blog.pageobject.TodoApplication;
import org.junit.AfterClass;
import org.junit.BeforeClass;
import org.junit.Test;
import org.junit.runner.RunWith;
import org.openqa.selenium.WebDriver;
import org.openqa.selenium.chrome.ChromeDriver;
import org.springframework.boot.test.SpringApplicationConfiguration;
import org.springframework.boot.test.WebIntegrationTest;
import org.springframework.test.context.junit4.SpringJUnit4ClassRunner;

@RunWith(SpringJUnit4ClassRunner.class)
@SpringApplicationConfiguration(classes = TodoApplication.class)
@WebIntegrationTest
public class ItemsAppTest {
    private static WebDriver driver;

    @BeforeClass
    public static void setUp() {
        ChromeDriverManager.getInstance().setup();
        driver = new ChromeDriver();
    }

    @AfterClass
    public static void tearDown() {
        driver.quit();
    }

    @Test
    public void testCreateTodos() {
        // GIVEN
        new ItemsPageObject(driver).get()

            // WHEN
            .addTodo("Buy groceries")
            .addTodo("Tidy up")

            // THEN
            .getTodoList()
            .verifyItemShown("Buy groceries", false)
            .verifyItemShown("Tidy up", false);
    }

    @Test
    public void testCompleteTodo() {
        // GIVEN
        new ItemsPageObject(driver).get()
            .addTodo("Buy groceries")
            .addTodo("Tidy up")
            .getTodoList()

            // WHEN
            .clickOnItem("Buy groceries")

            // THEN
            .verifyItemShown("Buy groceries", true)
            .verifyItemShown("Tidy up", false);
    }

    @Test
    public void testSelectTodosActive() {
        // GIVEN
        ItemsPageObject todoPage = new ItemsPageObject(driver).get();

        todoPage
            .addTodo("Buy groceries")
            .addTodo("Tidy up")
            .getTodoList()
            .clickOnItem("Buy groceries");

        // WHEN
        todoPage
            .selectActive()

            // THEN
            .getTodoList()
            .verifyItemNotShown("Buy groceries")
            .verifyItemShown("Tidy up", false);
    }

    @Test
    public void testSelectTodosCompleted() {
        // GIVEN
        ItemsPageObject todoPage = new ItemsPageObject(driver).get();
        todoPage
            .addTodo("Buy groceries")
            .addTodo("Tidy up")
            .getTodoList()
            .clickOnItem("Buy groceries");

        // WHEN
        todoPage
            .selectCompleted()

            // THEN
            .getTodoList()
            .verifyItemShown("Buy groceries", true)
            .verifyItemNotShown("Tidy up");
    }

    @Test
    public void testSelectTodosAll() {
        // GIVEN
        ItemsPageObject todoPage = new ItemsPageObject(driver).get();
        todoPage
            .addTodo("Buy groceries")
            .addTodo("Tidy up")
            .getTodoList()
            .clickOnItem("Buy groceries");
        todoPage
            .selectCompleted()

            // WHEN
            .selectAll()

            // THEN
            .getTodoList()
            .verifyItemShown("Buy groceries", true)
            .verifyItemShown("Tidy up", false);
    }

    @Test
    public void testCreateGroceryItems() {
        // GIVEN
        new ItemsPageObject(driver).get()

            // WHEN
            .addGroceryItem("avocados")
            .addGroceryItem("tomatoes")

            // THEN
            .getGroceryList()
            .verifyItemShown("avocados", false)
            .verifyItemShown("tomatoes", false);
    }

    @Test
    public void testCompleteGroceryItem() {
        // GIVEN
        new ItemsPageObject(driver).get()
            .addGroceryItem("avocados")
            .addGroceryItem("tomatoes")
            .getGroceryList()

            // WHEN
            .clickOnItem("avocados")

            // THEN
            .verifyItemShown("avocados", true)
            .verifyItemShown("tomatoes", false);
    }

    @Test
    public void testSelectGroceryItemsActive() {
        // GIVEN
        ItemsPageObject todoPage = new ItemsPageObject(driver).get();

        todoPage
            .addGroceryItem("avocados")
            .addGroceryItem("tomatoes")
            .getGroceryList()
            .clickOnItem("avocados");

        // WHEN
        todoPage
            .selectActive()

            // THEN
            .getGroceryList()
            .verifyItemNotShown("avocados")
            .verifyItemShown("tomatoes", false);
    }

    @Test
    public void testSelectGroceryItemsCompleted() {
        // GIVEN
        ItemsPageObject todoPage = new ItemsPageObject(driver).get();
        todoPage
            .addGroceryItem("avocados")
            .addGroceryItem("tomatoes")
            .getGroceryList()
            .clickOnItem("avocados");

        // WHEN
        todoPage
            .selectCompleted()

            // THEN
            .getGroceryList()
            .verifyItemShown("avocados", true)
            .verifyItemNotShown("tomatoes");
    }

    @Test
    public void testSelectGroceryItemsAll() {
        // GIVEN
        ItemsPageObject todoPage = new ItemsPageObject(driver).get();
        todoPage
            .addGroceryItem("avocados")
            .addGroceryItem("tomatoes")
            .getGroceryList()
            .clickOnItem("avocados");
        todoPage
            .selectCompleted()

            // WHEN
            .selectAll()

            // THEN
            .getGroceryList()
            .verifyItemShown("avocados", true)
            .verifyItemShown("tomatoes", false);
    }

    @Test
    public void testSelectCombinedItemsActive() {
        // GIVEN
        ItemsPageObject todoPage = new ItemsPageObject(driver).get();

        todoPage
            .addTodo("Buy groceries")
            .addTodo("Tidy up")
            .addGroceryItem("avocados")
            .addGroceryItem("tomatoes");

        todoPage
            .getGroceryList()
            .clickOnItem("avocados");

        todoPage
            .getTodoList()
            .clickOnItem("Tidy up");

        // WHEN
        todoPage
            .selectActive();

        // THEN
        todoPage
            .getTodoList()
            .verifyItemShown("Buy groceries", false)
            .verifyItemNotShown("Tidy up");

        todoPage
            .getGroceryList()
            .verifyItemNotShown("avocados")
            .verifyItemShown("tomatoes", false);
    }
}
We at Dotsub are using videojs as video player for our sites. One of the Video.js main benefits is customizability via its plugin system. Recently we had a need to automatically select certain subtitle track after user started video on Video.js player. This is handy when we know the language user is most probably going to need translation into. So we created simple open-source plugin to save few user clicks needed for selecting default subtitle track.
The plugin was named videojs-select-subtitle and is hosted on Github. Assuming you know how to use Video.js plugin for you video player, we jump straight to explaining how to configure this new plugin.
Installation
Most modern JavaScript projects are using some kind of Node.JS based build process with NPM dependency management. So easiest way to install plugin is to use NPM:
npm i --save videojs-select-subtitle
Your other option is to clone Github project build the project with command:
npm run build
This command creates JavaScript files in sub-directory dist. You can include minified or non-minified version of JavaScript plugin file into your project with whatever mechanism you are used to.
Usage
After after videojs player is initialized and plugin is installed in our project, we can execute it with command:
player.selectSubtitle({ trackLanguage: 'es' });
Object passed as parameter into selectSubtitle function is option required by plugin to select correct subtitle/caption track. Options object has to have trackLanguage key and value needs to define language attribute of caption/subtitle track to be selected. Of course such track must be available in videojs player, otherwise plugin can’t select it at all. Both key and value of options object are case sensitive.
Usage on Brightcove Video Cloud
Video.js project was created by Brightcove. Therefore they made it very easy to embed Video.JS plugins into their Video Cloud service. If you are using this service as your online video platform, you can install videojs-subtitle-plugin via their UI.
In order to do this, you need to host built plugin file somewhere on the internet. After plugin is accessible by Brightcove Video Cloud, you can refer to it from your Brightcove player. It is important to configure name of the plugin to selectSubtitle and trackLanguage option for the plugin:
After the user starts video, plugin finds desired caption/subtitle track and show it automatically.
This blog post will provide example of end-to-end Selenium tests in Java with usage of Page Object pattern.
Every responsible developer knows that end-to-end test is necessary at some point. When you want to test web application end-to-end, there is only one decent open-source option: Selenium. Of course end-to-end test suite have to be maintainable. To achieve that, I believe we have to use Page Object pattern for each web screen present in web application. Martin Fowler’s link explains very well benefits of this pattern, therefore I skip theory.
We at Dotsub are using Java platform with Spring Boot for back-end. Therefore Java Selenium APIs were natural fit for our needs. This blog post will explain Page Object pattern on application built with Spring Boot. For UI, it will use famous Dan Abramov’s Todos example. This example was used for Getting started with Redux tutorial. It is simple single page application built on top of React + Redux JavaSript frameworks. It provides us decent functionality we can cover by Selenium test examples.
Functionality for testing
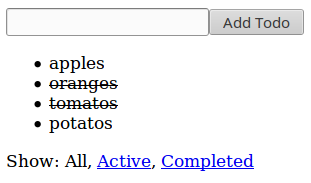
Let’s take a look at functionality of this simple example.
In text Input field, we can enter name of Todo item. Button Add Todo saves item into Todos list. When we click on any Todo item we can mark it as complete or incomplete.
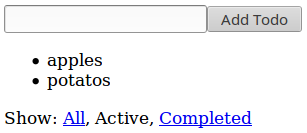
With Show buttons below the Todos list, we can filter items to show only Active…
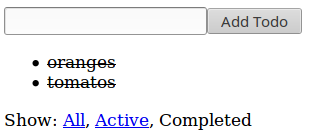
…or Completed Todo items.
In fact this Todos example application doesn’t communicate with Spring Boot server. Front-end assets are just served from Spring Boot application. But we don’t need such communication to demonstrate Page Object example. I used Spring Boot, because it’s trivial to integrate Selenium tests with it. Note that goal of this blog post isn’t to explain Selenium or its APIs. It is expected for reader to be slightly familiar with them already.
Page Object class
As we mentioned, our end-to-end test will use Page object pattern. Goal of this pattern is to separate HTML details of testing page from actions that can be performed against the page. Listing that shows Page Object class for Todos application will be split into few parts, so that we can explain each part separately:
Page Object class has two fields. First is Selenium WebDriver instance, which represents browser’s window wrapper used for controlling web page similar to real user. WebDriverWait is helper for waiting until HTML elements are rendered. Method get is used to load Todos page based on it’s URL.
These three methods are private helpers for Todos actions shown later. We will used them to find HTML element or list of HTML elements based on the text they contain. For text search we use Selenium’s XPath APIs.
I believe names addTodo and clickOnTodoItem are self explanatory. We will use them to enter test into Todos input list, click Add Todo button and to mark Todo items complete/incomplete. Notice that return value is Todos Page Object instance, so that we can use fluent API during testing. This mechanism will keep our tests less verbose.
    public TodoPageObject selectAll() {
        findElementWithText("All").click();
        return this;
    }

    public TodoPageObject selectActive() {
        findElementWithText("Active").click();
        return this;
    }

    public TodoPageObject selectCompleted() {
        findElementWithText("Completed").click();
        return this;
    }
These three methods are using for clicking on filter buttons All/Active/Complete.
Last two methods are used to verify if given Todo item is shown on not shown. When it’s shown we can verify if it’s completed via parameter expectedStrikethrough.
Tests
With such page object support we can start testing:
package net.lkrnac.blog.pageobject.e2e;

import io.github.bonigarcia.wdm.ChromeDriverManager;
import net.lkrnac.blog.pageobject.TodoApplication;
import org.junit.AfterClass;
import org.junit.BeforeClass;
import org.junit.Test;
import org.junit.runner.RunWith;
import org.openqa.selenium.WebDriver;
import org.openqa.selenium.chrome.ChromeDriver;
import org.springframework.boot.test.SpringApplicationConfiguration;
import org.springframework.boot.test.WebIntegrationTest;
import org.springframework.test.context.junit4.SpringJUnit4ClassRunner;

@RunWith(SpringJUnit4ClassRunner.class)
@SpringApplicationConfiguration(classes = TodoApplication.class)
@WebIntegrationTest
public class TodoAppTest {
    private static WebDriver driver;

    @BeforeClass
    public static void setUp() {
        ChromeDriverManager.getInstance().setup();
        driver = new ChromeDriver();
    }

    @AfterClass
    public static void tearDown() {
        driver.quit();
    }

    @Test
    public void testCreateTodos() {
        // GIVEN
        new TodoPageObject(driver).get()

            // WHEN
            .addTodo("testTodo1")
            .addTodo("testTodo2")

            // THEN
            .verifyTodoShown("testTodo1", false)
            .verifyTodoShown("testTodo2", false);
    }

    @Test
    public void testCompleteTodo() {
        // GIVEN
        new TodoPageObject(driver).get()
            .addTodo("testTodo1")
            .addTodo("testTodo2")

            // WHEN
            .clickOnTodoItem("testTodo1")

            // THEN
            .verifyTodoShown("testTodo1", true)
            .verifyTodoShown("testTodo2", false);
    }

    @Test
    public void testSelectActive() {
        // GIVEN
        new TodoPageObject(driver).get()
            .addTodo("testTodo1")
            .addTodo("testTodo2")
            .clickOnTodoItem("testTodo1")

            // WHEN
            .selectActive()

            // THEN
            .verifyTodoNotShown("testTodo1")
            .verifyTodoShown("testTodo2", false);
    }

    @Test
    public void testSelectCompleted() {
        // GIVEN
        new TodoPageObject(driver).get()
            .addTodo("testTodo1")
            .addTodo("testTodo2")
            .clickOnTodoItem("testTodo1")

            // WHEN
            .selectCompleted()

            // THEN
            .verifyTodoShown("testTodo1", true)
            .verifyTodoNotShown("testTodo2");
    }

    @Test
    public void testSelectAll() {
        // GIVEN
        new TodoPageObject(driver).get()
            .addTodo("testTodo1")
            .addTodo("testTodo2")
            .clickOnTodoItem("testTodo1")
            .selectCompleted()

            // WHEN
            .selectAll()

            // THEN
            .verifyTodoShown("testTodo1", true)
            .verifyTodoShown("testTodo2", false);
    }
}
These test cases cover some basic scenarios real user could perform against our Todos application. I am not going to explain them, because they are nicely readable due to usage of Page Object pattern. Separate huge benefit of this pattern I want to point out is decoupling tests from HTML. If we would change HTML structure on Todos page, we would need to change only Page Object class. Test cases would remain untouched.