Tag Archives: TravisCI

Aggregate Test Coverage Report for Gradle Multi-Module Project

I am going to explain how to aggregate test coverage report for Gradle multi-module project. For measuring test coverage, we will use JaCoCo. Example project will use TravisCI build server and will submit coverage report to Coveralls.io.

Multi-Module project is project which creates various modules in single build, typically JARs in Java world. Such project structure is handy for splitting monolithic projects into decoupled pieces. But wait a second. Didn’t Microservices fever put monoliths into architecture anti-pattern position? No, it didn’t.

Problem

We are also building monolithic application at Dotsub. Build system of our choice is Gradle and build server is TravisCI. We use Coveralls.io to store our test coverage reports. When our code-base grew to the point when we needed to separate concerns into separate modules, I ran into problems around gathering test coverage. On Coveralls.io, you can submit only one coverage report per TravisCI build. As we wanted to have whole project built with single build, our only option was merging test coverage reports for each module and submit such aggregated report.

Example Project Structure

Our example project will have 4 modules. It is hosted in this Github repository.

.
├── build.gradle
├── .coveralls.yml
├── gradlecoverage
│   ├── build.gradle
│   └── src
│       ├── main
│       │   └── java
│       │       └── net
│       │           └── lkrnac
│       │               └── blog
│       │                   └── gradlecoverage
│       │                       └── GradleCoverageApplication.java
│       └── test
│           └── java
│               └── net
│                   └── lkrnac
│                       └── blog
│                           └── gradlecoverage
│                               └── GradleCoverageApplicationTest.java
├── module1
│   ├── build.gradle
│   └── src
│       ├── main
│       │   └── java
│       │       └── net
│       │           └── lkrnac
│       │               └── blog
│       │                   └── gradlecoverage
│       │                       └── Module1Service.java
│       └── test
│           └── java
│               └── net
│                   └── lkrnac
│                       └── blog
│                           └── gradlecoverage
│                               └── Module1ServiceTest.java
├── module2
│   ├── build.gradle
│   └── src
│       ├── main
│       │   └── java
│       │       └── net
│       │           └── lkrnac
│       │               └── blog
│       │                   └── gradlecoverage
│       │                       └── Module2Service.java
│       └── test
│           └── java
│               └── net
│                   └── lkrnac
│                       └── blog
│                           └── gradlecoverage
│                               └── Module2ServiceTest.java
├── moduleCommon
│   ├── build.gradle
│   └── src
│       ├── main
│       │   └── java
│       │       └── net
│       │           └── lkrnac
│       │               └── blog
│       │                   └── gradlecoverage
│       │                       └── CommonService.java
│       └── test
│           └── java
│               └── net
│                   └── lkrnac
│                       └── blog
│                           └── gradlecoverage
│                               └── CommonServiceTest.java
├── settings.gradle
└── .travis.yml

There is main module gradlecoverage, which is dependent on module1 and module2. Last moduleCommon is shared dependency for module1 and module2. Each module contains simple string concatenation logic with test. The code is very basic, so we are not going to explain it here. You can inspect it on Github.

Each test intentionally doesn’t cover some test cases. This way we will prove that test coverage reports are accurate.

Module Build Script

Each module has very simple build script. Example of module1/gradle.properties follows:

jar {
    baseName = 'module1'
}

dependencies {
    compile project(':moduleCommon')
}

The script just defines JAR module name and imports other module as dependency. Other scripts have very similar build scripts.

Main Build Script

First of all we need to import all sub-modules in settings.properties:

include 'moduleCommon'
include 'module1'
include 'module2'
include 'gradlecoverage'

In main script we will apply jacoco and coveralls plugins. JaCoCo plugin will be needed for aggregating coverage reports form sub-modules. We will create custom task for aggregation. Coveralls plugin will submit aggregated report to Coveralls.io.

plugins {
    id 'jacoco'
    id 'com.github.kt3k.coveralls' version '2.6.3'
}

repositories {
    mavenCentral()
}

Next we configure Java and import dependencies for sub-modules in subprojects section:

subprojects {
    repositories {
        mavenCentral()
    }

    apply plugin: 'java'
    apply plugin: "jacoco"

    group = 'net.lkrnac.blog'
    version = '1.0-SNAPSHOT'

    sourceCompatibility = JavaVersion.VERSION_1_8
    targetCompatibility = JavaVersion.VERSION_1_8

    dependencies {
        testCompile("junit:junit:4.12")
    }
}

For each sub-module, Java plugin will build JAR artifact. Each module is tested by JUnit framework. Test coverage is measured by JaCoCo plugin.

Aggregate Test Coverage Reports

Last piece of build configuration will aggregate test coverage reports:

def publishedProjects = subprojects.findAll()

task jacocoRootReport(type: JacocoReport, group: 'Coverage reports') {
    description = 'Generates an aggregate report from all subprojects'

    dependsOn(publishedProjects.test)

    additionalSourceDirs = files(publishedProjects.sourceSets.main.allSource.srcDirs)
    sourceDirectories = files(publishedProjects.sourceSets.main.allSource.srcDirs)
    classDirectories = files(publishedProjects.sourceSets.main.output)
    executionData = files(publishedProjects.jacocoTestReport.executionData)

    doFirst {
        executionData = files(executionData.findAll { it.exists() })
    }

    reports {
        html.enabled = true // human readable
        xml.enabled = true // required by coveralls
    }
}

coveralls {
    sourceDirs = publishedProjects.sourceSets.main.allSource.srcDirs.flatten()
    jacocoReportPath = "${buildDir}/reports/jacoco/jacocoRootReport/jacocoRootReport.xml"
}

tasks.coveralls {
    dependsOn jacocoRootReport
}

First we read all sub-modules into publishedProjects variable. After that we define custom aggregation jacocoRootReport task. It is inherited from JacocoReport task type. This task will be dependent on test task of each module from publishedProjects. This makes sure that test coverage reports for sub-modules are gathered for aggregation before jacocoRootReport is executed. Next we configure necessary directories for JaCoCo engine and gather all execution data from sub-modules.

Lastly we configure what kind of output we want to generate. Configuration xml.enabled = true will create aggregated report which will be submitted to Coveralls.io via coveralls task.

TravisCI Manifest

TravisCI Manifest (.travis.yml) file configure Java environment and runs single command to build and submit aggregated test coverage report by executing coveralls task:

language: java
jdk:
  - oraclejdk8

install: echo "skip './gradlew assemble' step"

script: ./gradlew build coveralls --continue

Coveralls Manifest

To be able to submit report to coveralls, we need to define Coveralls.io repository token in file .coveralls.yml:

repo_token: JQofR7TNqCMebvHgE8wHwF6rznjvEc0Fr

Final Report

Final report can be found here:

aggregate test coverage report

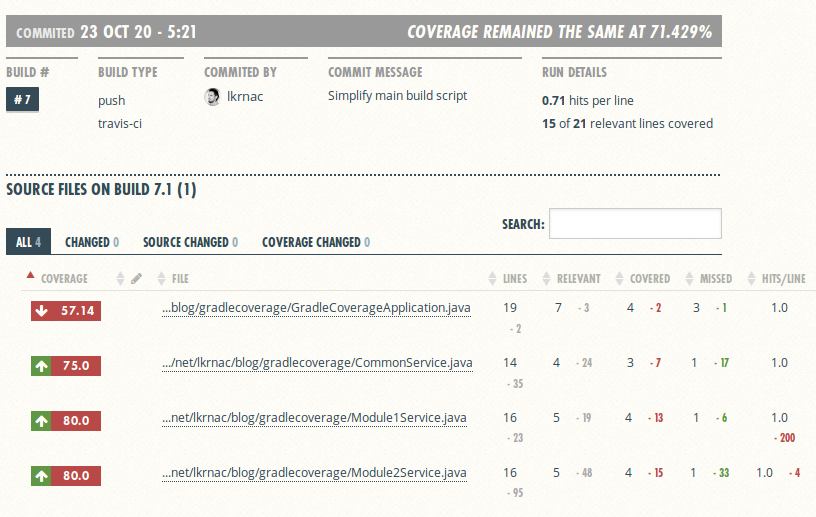
As you can see, there are all classes from separate modules. The only problem is that we can’t fond which module class belong to from such coverage report. But it’s not a big deal to me.

Credits

Custom aggregation task was inspired by build script for Caffeine project. It is caching library.

Selenium Travis

Speed up Gradle build on TravisCI

I was recently speeding up Gradle build on TravisCI for one Dotsub project. It builds Spring Boot based project (written in Java), but also uses Gulp sub-tasks on top of NodeJS to bundle front-end code and assets. This blog post is about sharing these small build optimization hints. They are also shared in this Github repository.

Default TravisCI configuration for Gradle

By default, when Travis detects Gradle as build system it configures these two phases by default:

install: gradle assemble
build: gradle check

So as part of your build, Gradle is executed twice by default. And it also does make some sense when you take a look at how Gradle Java plugin works:

Gradle Java plugin tasks

As you can see assemble and check phases has only few initial phases in common. There isn’t much tasks redundancy if we run assemble and check separately.

There is also Gradle UP-TO-DATE feature. It means Gradle is smart enough to mark task as UP-TO-DATE after first execution. Redundant execution of this task can be than skipped if its input doesn’t change. Of course it works across various separate build executions. Let’s take a look at what happen when we build mentioned example project with this example configuration. Link to build is here.

$ ./gradlew assemble
:compileJava
:processResources
:classes
:findMainClass
:jar
:bootRepackage
:assemble

BUILD SUCCESSFUL

Total time: 21.0 secs

$ ./gradlew check
:compileJava UP-TO-DATE
:processResources UP-TO-DATE
:classes UP-TO-DATE
:compileTestJava
:processTestResources UP-TO-DATE
:testClasses
:test
2016-02-06 11:26:06.883  INFO 2455 --- [       Thread-6] ationConfigEmbeddedWebApplicationContext : Closing org.springframework.boot.context.embedded.AnnotationConfigEmbeddedWebApplicationContext@295c442d: startup date [Sat Feb 06 11:25:47 UTC 2016]; root of context hierarchy
:check

BUILD SUCCESSFUL

Total time: 55.216 secs

Notice that Full elapsed time was 1 min 49 seconds.

As you can see execution of check task didn’t have to run tasks compileJava, processResources and classes again, because they were executed previously as part of assemble task.

So TravisCI default configuration may seem reasonable for Gradle.

Merge install and script phase

But even if Gradle makes best effort to reduce overhead, the overhead is there. As Gradle Java Plugin tasks visualization showed earlier in the blog post, we can cover assemble and check tasks with build task. So why should we run two Gradle processes in single build when single process execution is enough?

Also mentioned two default tasks may be fine for Continuous Integration workflow, but modern developers and teams doesn’t stop there. Every company that takes software development seriously wants to incorporate Continuous Delivery or Continuous Deployment. So we want to assemble, check, build and deploy all our assets in one build pipeline. So why would we want to run two Gradle processes?

Let’s do this:

install: echo "skip 'gradle assemble' step"
script: gradle build --continue

In Travis Install phase we override default assemble task and run full Gradle build as one process. Let take a look at timings of such build for very same example project. Build link is here.

$ echo "skip './gradlew assemble' step"
skip './gradlew assemble' step
$ ./gradlew build --continue
:compileJava
:processResources
:classes
:findMainClass
:jar
:bootRepackage
:assemble
:compileTestJava
:processTestResources UP-TO-DATE
:testClasses
:test
2016-01-31 20:19:37.202  INFO 2353 --- [       Thread-6] ationConfigEmbeddedWebApplicationContext : Closing org.springframework.boot.context.embedded.AnnotationConfigEmbeddedWebApplicationContext@46441da4: startup date [Sun Jan 31 20:19:24 UTC 2016]; root of context hierarchy
:check
:build

BUILD SUCCESSFUL

Total time: 36.926 secs

Notice that Full elapsed time was 59 seconds.

So even if Gradle tries to optimize tasks as much as possible, there is noticeable overhead running two separate Gradle processed instead of two.

Cache Gradle and NodeJS dependencies

Second hint to speed up TravisCI build for Gradle can be found in TravisCI docs itself. It involves Gradle dependencies caching.

As I mentioned at the beginning, project I work on also involves Gulp/NodeJS build. Therefore it make sense to put also NPM dependencies into TravisCI cache. Gradle integration with Gulp can be done via Gradle Gulp plugin. This plugin locates NPM global dependencies into $HOME/.gradle/nodejs and local NPM depndencies into node_modules folder.

So full of Gradle caching configuration for our build looks like this:

before_cache:
  - rm -f $HOME/.gradle/caches/modules-2/modules-2.lock
cache:
  directories:
    - $HOME/.gradle/caches/
    - $HOME/.gradle/wrapper/
    - $HOME/.gradle/nodejs/
    - node_modules

Don’t ask me why we need to remove lock in before_cache section. That is taken from mentioned TravisCI docs. Rest of the configuration caches all Gradle and NPM dependencies between builds.

Here is link to build without this caching: 1 min 56 seconds

Here is link to build with this caching: 59 seconds. This example build doesn’t contain Gradle Gulp plugin, so saving from NPM dependencies caching are not included.

Conclusion

These two simple tricks cut off around 4 minutes from Dotsub project build I mentioned. Pretty nice when it’s for free. If you want to mess with this example, you can look at this Github repo.

Selenium tests on Gradle in Travis

Run Selenium tests on TravisCI

Stack of application I am currently working on at Dotsub is based on Java/Spring Boot back-end and React/Redux front-end. To have confidence that this application works end to end, we are using Selenium tests. It is very easy to run them as part application build, because Spring Boot testing support allows to run full application as part of application build. We use Gradle as main build system and it is all running on Travis continuous integration server. To demonstrate this approach for end to end testing I created small Hello World project on GitHub.

Build

Build system of choice is Gradle. Creation of following Gradle script was very easy, because I used Spring Initializr:

buildscript {
	ext {
		springBootVersion = '1.3.2.RELEASE'
	}
	repositories {
		mavenCentral()
	}
	dependencies {
		classpath("org.springframework.boot:spring-boot-gradle-plugin:${springBootVersion}")
	}
}

apply plugin: 'java'
apply plugin: 'idea'
apply plugin: 'spring-boot'

jar {
	baseName = 'blog-2016-01-selenium-on-travis'
	version = '0.0.1-SNAPSHOT'
}

sourceCompatibility = 1.8
targetCompatibility = 1.8

repositories {
	mavenCentral()
}


dependencies {
	compile('org.springframework.boot:spring-boot-starter')
	compile('org.springframework.boot:spring-boot-starter-web')
	testCompile('org.springframework.boot:spring-boot-starter-test')
    testCompile("org.seleniumhq.selenium:selenium-firefox-driver:2.49.0")
    testCompile('org.seleniumhq.selenium:selenium-support:2.49.0')
}

task wrapper(type: Wrapper) {
	gradleVersion = '2.9'
}

The only additional dependencies against generated script (by Spring Initializr) are Selenium, Firefox Selenium driver and Spring Starter Web. Adding spring-boot-starter-web into build will transform our project into web application with embedded Tomcat servlet container.

Hello World Application

To demonstrate Selenium Tests automation, I created very simple application code. First of all we need Spring Boot main class:

package net.lkrnac.blog.seleniumontravis;

import org.springframework.boot.SpringApplication;
import org.springframework.boot.autoconfigure.SpringBootApplication;

@SpringBootApplication
public class Application {
    public static void main(String... args){
        SpringApplication.run(Application.class);
    }
}

It is very standard Spring Boot construct for Spring context initialization.  Annotation @SpringBootApplication turns on Spring Boot auto-configuration. It sets up most sensible defaults for out application, which is most importantly embedded servlet container in this case.

Second part of our simple application code is front-end code. For demonstration purposes this simplest React example (taken from React getting started guide) will be enough:

<!DOCTYPE html>
<html>

<head>
    <meta charset="UTF-8" />
    <title>Hello React!</title>
    <script src="https://cdnjs.cloudflare.com/ajax/libs/react/0.14.7/react.min.js"></script>
    <script src="https://cdnjs.cloudflare.com/ajax/libs/react/0.14.7/react-dom.min.js"></script>
    <script src="https://cdnjs.cloudflare.com/ajax/libs/babel-core/5.8.23/browser.min.js"></script>
</head>

<body>
<div id="hello" />

<script type="text/babel">
    ReactDOM.render(
    <h1>Hello, world!</h1>, document.getElementById('hello') );
</script>
</body>

</html>

It uses Babel to transpile JSX inline and pulls React libraries from CDN. It doesn’t do any AJAX calls to server. We also didn’t create any Spring controller for serving requests. It is because goal of this example is to demonstrate Selenium testing against React+Spring Boot app, therefore I skipped communication between client and server.

This simple HTML + React Hello World page is located in file src/main/resources/static/index.html, where it will be picked up by Spring Boot and exposed as default web page content when request hits root URL of embedded servlet container.

Simple Selenium Test

Following listing shows how can we approach selenium testing against Spring Boot application:

import net.lkrnac.blog.seleniumontravis.Application;
import org.junit.AfterClass;
import org.junit.BeforeClass;
import org.junit.Test;
import org.junit.runner.RunWith;
import org.openqa.selenium.By;
import org.openqa.selenium.firefox.FirefoxDriver;
import org.openqa.selenium.support.ui.ExpectedConditions;
import org.openqa.selenium.support.ui.WebDriverWait;
import org.springframework.boot.test.SpringApplicationConfiguration;
import org.springframework.boot.test.WebIntegrationTest;
import org.springframework.test.context.junit4.SpringJUnit4ClassRunner;

import java.io.IOException;

@RunWith(SpringJUnit4ClassRunner.class)
@SpringApplicationConfiguration(Application.class)
@WebIntegrationTest
public class ApplicationTest {
    private static FirefoxDriver driver;

    @BeforeClass
    public static void setUp() throws IOException {
        driver = new FirefoxDriver();
    }

    @Test
    public void contextLoads() {
        driver.get("https://localhost:8080");
        WebDriverWait wait = new WebDriverWait(driver, 10);
        wait.until(ExpectedConditions.textToBePresentInElementLocated(
                By.id("hello"), "Hello, world!"));
    }

    @AfterClass
    public static void tearDown() {
        driver.quit();
    }
}

Before test, it starts Firefox Selenium driver. During test it visits default specified address https://localhost:8080. This should hit our index.html. Next phase of the test is waiting for Hello, world! header to be rendered on screen. After this happens, test is done and Selenium driver is closed. When we run this test locally, we can see following pop-up appear on the screen.

Selenoum Tests

Travis Configuration

Last piece of this example it TravisCI configuration manifest. Relevant parts of it are here:

language: java
jdk:
  - oraclejdk8

before_script:
  - "export DISPLAY=:99.0"
  - "sh -e /etc/init.d/xvfb start"
  - sleep 3 # give xvfb some time to start

script: ./gradlew build --continue

First of all we specify that Java 8 is our language of choice. Before script part is taken from TravisCI docs. It starts Xvfb (X virtual frame buffer), which simulates X11 display server on Linux machine without screen. This allows render our site virtually, because TravisCI build machine contains installation of Firefox by default. This configuration is enough for Selenium tests. In script phase we start full Gradle build.

Possible Travis problems and solution

All this configuration may be enough for you to start simple Selenium testing again React application. But default Firefox version on TravisCI machine is 31.0 ESR. This is quite old version and some of our React pages may not be rendered correctly during the build. Luckily TravisCI allows to update Firefox version with this simple manifest declaration:

addons:
  firefox: "44.0"

This installs new version of Firefox on TravisCI, but unfortunately it is not enough because of this open TravisCI issue. Consequence is that default configuration of Selenium Firefox driver configuration use old Firefox binary instead of new one.

But when I executed which firefox command on Travis, it was pointing to new binary file. Therefore I used this Selenium Driver initialization to pick up newer Firefox binary on Travis:

import net.lkrnac.blog.seleniumontravis.Application;
import org.junit.AfterClass;
import org.junit.BeforeClass;
import org.junit.Test;
import org.junit.runner.RunWith;
import org.openqa.selenium.By;
import org.openqa.selenium.firefox.FirefoxBinary;
import org.openqa.selenium.firefox.FirefoxDriver;
import org.openqa.selenium.firefox.FirefoxProfile;
import org.openqa.selenium.support.ui.ExpectedConditions;
import org.openqa.selenium.support.ui.WebDriverWait;
import org.slf4j.Logger;
import org.slf4j.LoggerFactory;
import org.springframework.boot.test.SpringApplicationConfiguration;
import org.springframework.boot.test.WebIntegrationTest;
import org.springframework.test.context.junit4.SpringJUnit4ClassRunner;

import java.io.BufferedReader;
import java.io.File;
import java.io.IOException;
import java.io.InputStreamReader;

@RunWith(SpringJUnit4ClassRunner.class)
@SpringApplicationConfiguration(Application.class)
@WebIntegrationTest
public class UseNewFirefoxOnTravisTest {
    private static FirefoxDriver driver;

    @BeforeClass
    public static void setUp() throws IOException {
        String travisCiFlag = System.getenv().get("TRAVIS");
        FirefoxBinary firefoxBinary = "true".equals(travisCiFlag)
                ? getFirefoxBinaryForTravisCi()
                : new FirefoxBinary();

        driver = new FirefoxDriver(firefoxBinary, new FirefoxProfile());
    }

    private static FirefoxBinary getFirefoxBinaryForTravisCi() throws IOException {
        String firefoxPath = getFirefoxPath();
        Logger staticLog = LoggerFactory.getLogger(UseNewFirefoxOnTravisTest.class);
        staticLog.info("Firefox path: " + firefoxPath);

        return new FirefoxBinary(new File(firefoxPath));
    }

    private static String getFirefoxPath() throws IOException {
        ProcessBuilder pb = new ProcessBuilder("which", "firefox");
        pb.redirectErrorStream(true);
        Process process = pb.start();
        try (InputStreamReader isr = new InputStreamReader(process.getInputStream(), "UTF-8");
             BufferedReader br = new BufferedReader(isr)) {
            return br.readLine();
        }
    }

    @Test
    public void contextLoads() {
        driver.get("https://localhost:8080");
        WebDriverWait wait = new WebDriverWait(driver, 10);
        wait.until(ExpectedConditions.textToBePresentInElementLocated(
                By.id("hello"),
                "Hello, world!")
        );
    }

    @AfterClass
    public static void tearDown() {
        driver.quit();
    }
}

Testing logic is the same as for example test we already introduced. Different is initialization of Firefox Selenium driver. In this case we first recognize if we are running in Travis environment via environment variable TRAVIS. If we are not running in Travis, we use default Firefox driver initialization.

If we are running in TravisCI build, we use standard Java class ProcessBuilder to execute Linux command which firefox in separate process and grab it’s output. This gives us path of newer Firefox binary. Based on this path, we initialize Firefox Selenium driver and are good to automatically run Selenium test against latest Firefox on TravisCI build machine.

Source code for this example is located in GitHub.